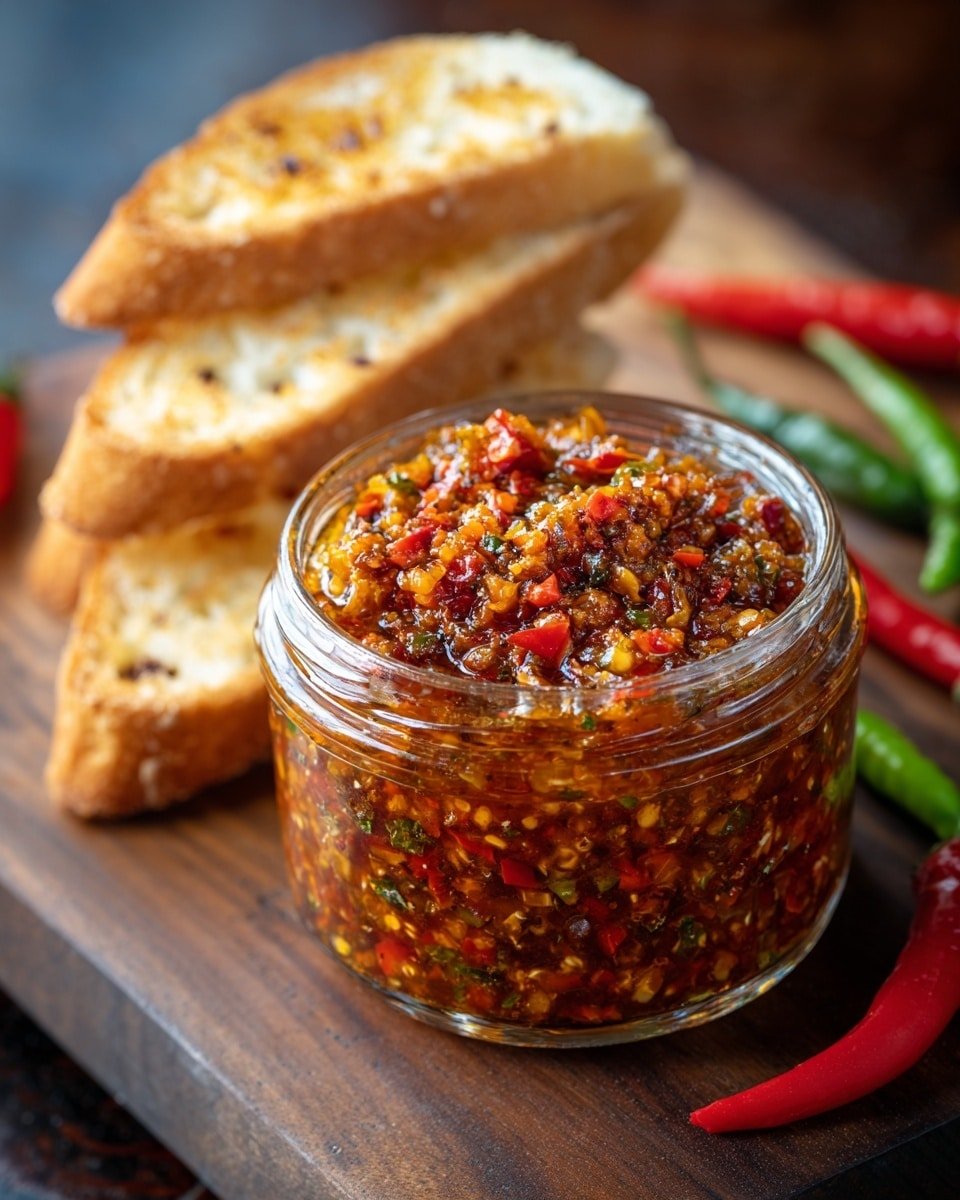
If you're looking to add a smoky, deeply comforting spread to your kitchen repertoire, then my Roasted Eggplant and Pepper Spread (Zacusca) Recipe might just become your new favorite. This classic Eastern European spread is perfect when peppers and eggplants are in season, and it's wonderful for layering flavor on toast, sandwiches, or as a dip during gatherings. Once you try it, you'll see why it's so beloved and why you'll want to make it time and again.
Jump to:
Why You'll Make This on Repeat
I've made this roasted eggplant and pepper spread countless times, and each batch fills my kitchen with such an inviting aroma that it's impossible not to dive right in. It's a labor of love that pays off in texture and flavor every single time.
- Reliable Texture: You'll end up with a thick, slightly chunky spread that isn't mushy-a perfect balance that's easy to spread yet still has body.
- Balanced, Cozy Flavor: Roasting the peppers and eggplants gives a deep smokiness that's rounded out by sweet tomato sauce and aromatic bay leaves.
- Pantry-Friendly: Once jarred properly, it stores well, letting you savor that summer-season taste year-round.
- Weeknight Simple: Though it cooks for hours, most of that time is unattended, so come evening you have a no-fuss, wholesome spread ready to go.
Ingredient Highlights

Every ingredient in this Roasted Eggplant and Pepper Spread (Zacusca) Recipe plays a memorable role. Sourcing fresh, ripe peppers and firm eggplants is essential for the rich flavor profile you're aiming to achieve, so I always take a little time at the market choosing the best.
- Eggplants: Look for glossy, firm ones with no soft spots; piercing them before grilling prevents bursting and helps the flesh become tender and silky.
- Capia or Red Bell Peppers: Choose peppers with vibrant color and smooth skin for the best roasting experience and flavor.
- Onions: Sweet yellow onions soften beautifully during cooking, adding subtle sweetness without overpowering.
- Tomato Sauce: Use a good-quality, smooth tomato sauce to build a luscious base.
- Vegetable Oil: A neutral oil works best since it doesn't compete with the peppers' smoky flavors.
Quick Note: Exact measurements and detailed steps are included in the printable recipe card at the bottom-perfect to keep handy when cooking.
Step-by-Step for Roasted Eggplant and Pepper Spread (Zacusca) Recipe
Step 1 - Prep & Season
Start by preparing your vegetables carefully. For the eggplants, piercing the skins with a knife before grilling helps prevent them from bursting and allows them to soften evenly. Roast them over medium heat until the skins are glossy and charred and the flesh inside becomes wonderfully soft, which takes about 30 to 45 minutes. Once cool, peel them gently-the skin should slip off easily if they're roasted enough. Drain any excess liquid by placing the peeled flesh in a colander to avoid a watery spread later.
For the peppers, you can grill or roast in the oven until most of the skin is blackened and blistered. Cooling them fully before peeling is key-either peel under running water or cover with salt in a bowl to loosen the skins. Removing the seeds and membranes thoroughly creates a smoother, less bitter spread. I love the ritual of roasting these vegetables-it fills my kitchen with that unmistakable smoky scent that hints at what's to come.
Step 2 - Build Flavor
Turn your attention to the onions next. Heat the vegetable oil gently in a very large pot - a heavy-bottomed one works best to prevent burning - and cook the onions slowly until they soften and just begin to turn golden. This slow cooking unlocks their sweetness and forms the flavor foundation of your spread. Then, scoop in your finely chopped eggplant and peppers, mixing carefully to combine the layers of smoky and sweet beautifully.
Pour in the tomato sauce and add the salt, black pepper, and a few bay leaves for earthiness. From here, the magic happens with a lengthy, low-and-slow simmer. I usually stir every 10 minutes to keep things from sticking, but be patient-this 3-hour simmer melds the flavors into a rich, cohesive spread full of depth and character that's so satisfying.
Step 3 - Finish for Best Texture
After simmering, your spread should be thickened and richly fragrant. The texture should be spreadable but with subtle chunks-you want to avoid any mushiness that could result from over-processing the vegetables. If you notice excess liquid, a final quick boil down on medium-high heat while stirring will help tighten everything up. Remember to taste and adjust seasoning if needed before moving to jar it.
Kitchen Notes I Rely On
Every time I make this Roasted Eggplant and Pepper Spread (Zacusca) Recipe, I remind myself that patience and attention to detail in the early roasting stages set the tone. Also, stirring regularly during the long simmer prevents sticking without breaking up the texture. Keeping the heat just right - mostly low - is crucial to develop that comforting depth without burning.
- Doneness Cue: Look for a silky-soft texture with slightly chunky bits, not a watery or pasty finish.
- Temperature Trick: Maintain a gentle simmer to develop flavor without scorching on the bottom.
- Make-Ahead Move: This spread actually tastes better after a day or two in the fridge, giving the flavors time to meld fully.
- Skip This Pitfall: Don't over-process your vegetables in the food processor; pulse just enough to chop but keep texture alive.
Serving & Sides

Finishing Touches
I like to finish this spread with a drizzle of good-quality extra virgin olive oil right before serving, which adds a luscious gloss and enhances the richness. A sprinkle of freshly chopped parsley or a light dusting of smoked paprika can elevate those smoky notes beautifully. When you serve, letting the spread come to room temperature improves the flavor and texture, making it irresistibly smooth and inviting.
Pairs Nicely With
This Roasted Eggplant and Pepper Spread (Zacusca) Recipe is fantastic alongside crusty bread or toasted baguette slices. I've also enjoyed it as a vibrant condiment with grilled meats, roasted potatoes, or tucked into sandwiches with fresh cheese. Its smoky sweetness can balance a winter stew or brighten a simple cheese board beautifully.
Simple Plating Upgrades
For a quick weeknight upgrade, serve the zacusca in a rustic bowl sprinkled with sesame seeds or toasted pine nuts to add crunch. For special occasions, arrange it as part of a mezze board with olives, cheeses, pickles, and fresh herbs. These little touches add texture and visual interest without much extra effort.
Make-Ahead & Storage
Storing Leftovers
Store leftover spread in airtight glass containers or sterilized jars. In the refrigerator, it will keep beautifully for up to 10 days, retaining its glossy texture and deep flavor. You'll notice the flavors continue to meld, which makes the next day's serving even better. Just bring it to room temperature before using.
Freezer Tips
This Roasted Eggplant and Pepper Spread (Zacusca) Recipe freezes quite well if you want to stash batches for longer. Portion it into freezer-safe containers, leaving some headroom for expansion. It's best thawed overnight in the fridge and then warmed gently. Texture might soften a bit after freezing, but the rich flavor remains intact.
Reheating Roasted Eggplant and Pepper Spread (Zacusca) Recipe Without Drying Out
Reheat this spread gently to preserve its creamy texture. I prefer warming it in a saucepan over low heat, stirring occasionally and adding a small splash of water or vegetable broth if it seems too thick or dry. The microwave works fine too-heat in short bursts, stirring between each, and cover with a damp paper towel to keep moisture in. Avoid high heat or long reheating times to prevent drying out or flavor loss.
Frequently Asked Questions
Absolutely! Roasting in a hot oven under the broiler or on a baking sheet works well too. Just turn the vegetables frequently to ensure even charring and to develop that signature smoky flavor.
You'll notice the mixture thickens significantly and the flavors deepen. The eggplants and peppers should be soft but not mushy, and stirring should leave a clear path on the pot's bottom before it fills in again.
Yes, following the sterilization steps carefully ensures safety and longevity. Using sterile jars and proper heat treatment minimizes the risk of spoilage and preserves your spread deliciously.
Definitely! Feel free to add crushed red pepper flakes or substitute black pepper with smoked paprika for a different kick. Just add these sparingly during the simmering step to let flavors meld without overpowering the balance.
Final Thoughts
This Roasted Eggplant and Pepper Spread (Zacusca) Recipe is one of those recipes that grows on you-not just because of its wonderful smoky flavor and satisfying texture, but because the process itself teaches you to slow down, savor simple ingredients, and celebrate seasonal bounty. Making it has become a ritual I look forward to each year, and I'm confident you'll feel the same joy sharing it with friends and family. So grab those eggplants and peppers, fire up your grill or oven, and get ready for a spread that's truly worth the wait.
PrintPrintable Recipe
Roasted Eggplant and Pepper Spread (Zacusca) Recipe

A rich and flavorful Roasted Eggplant and Pepper Spread featuring charred eggplants and peppers simmered with onions, tomato sauce, and spices, perfect for canning or serving as a delicious appetizer or side dish.
- Prep Time: 1 hour 30 minutes
- Cook Time: 3 hours
- Total Time: 4 hours 30 minutes
- Yield: 10 cups
- Category: Condiment
- Method: Stovetop
- Cuisine: Eastern European
Ingredients
Vegetables
- 5½ pounds eggplant (grilled until charred)
- 4½ pounds capia peppers (or red bell peppers, grilled until charred)
- 4½ pounds pimento peppers (grilled until charred)
- 2 pounds onions (chopped)
Other Ingredients
- 3 cups vegetable oil
- 6 cups tomato sauce
- 3 tablespoons salt (or to taste)
- 2 tablespoons black pepper (ground)
- 5 bay leaves
Instructions
- Prep Ingredients: Prepare the eggplants by poking holes in them to prevent bursting when grilling. Grill eggplants until soft and charred, about 45 minutes. Allow to cool completely, then peel off the skin carefully and drain any excess liquid.
- Grill the Peppers: Grill or roast capia and pimento peppers until almost completely charred. Cool thoroughly, then peel off skins by either rinsing under running water or resting under salt for 20 minutes. Remove seeds and drain excess liquid.
- Chop: Using a food processor, pulse the eggplants and peppers in batches until finely chopped but not pureed, preserving some texture.
- Cook Onions: In a very large pot, heat the vegetable oil over medium heat and sauté the chopped onions until they start to soften and change color, taking care not to burn them.
- Add Ingredients & Cook: Add the chopped eggplant and peppers to the pot with onions, stirring to combine. Add the tomato sauce, salt, black pepper, and bay leaves. Simmer on low to medium heat for 3 hours, stirring every 10 minutes to prevent sticking.
- Sterilize Jars: Wash canning jars in hot soapy water, then boil them covered in a water bath for 15 minutes once steam emerges. Turn off heat and keep jars in hot water until use.
- Place Jars in Oven: Before filling, place sterilized jars (without lids) in a 350°F oven for 10 minutes to ensure sterility.
- Fill The Jars: Carefully remove jars and fill with the hot spread, leaving about 1 inch headspace. Secure lids and screw bands tightly, holding lids with one finger.
- Finish And Let The Jars Cool: Return jars to the oven and bake for 15 minutes. Turn off oven and allow jars to cool inside for several hours to seal properly.
Notes
- To avoid eggplants bursting on the grill, make sure to pierce them thoroughly before cooking.
- Grilling peppers until charred enhances their smoky flavor essential for this spread.
- Peeling peppers after roasting is easier when they rest covered with salt for 20 minutes.
- Pulse vegetables in the food processor carefully to maintain some texture; avoid making a paste.
- Stir the cooking spread regularly to prevent burning and sticking, about every 10 minutes is ideal.
- When canning, ensure jars and lids are properly sterilized to increase shelf life and food safety.
- The recipe yields a large quantity suited for preservation or sharing with family and friends.


Leave a Reply