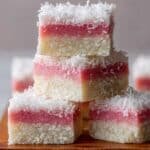
If you've been craving a nostalgic treat with a twist, you'll love this Pink Coconut Snow Bars Recipe. It's a tender, buttery bar with just the right balance of sweet coconut and a delicate pink hue that brightens any snack time. I often make these bars when I want something comforting yet special-a perfect bake for afternoon tea or a casual get-together.

Jump to:
Why You'll Make This on Repeat
Every time I bake these bars, the combination of pink coconut and a soft, cake-like crumb reminds me just how versatile simple ingredients can be. You'll notice the vibrant color adds a fun festive vibe without overpowering the cozy flavors, making this a go-to for celebrations or everyday sweetness.
- Reliable Texture: The bars hold together just right-moist and tender but with enough structure to cut cleanly into squares.
- Balanced, Cozy Flavor: Butter, vanilla, and a subtle coconut note blend effortlessly to comfort the palate.
- Pantry-Friendly: Uses basic ingredients you likely have on hand, making it easy to whip up without a special trip.
- Weeknight Simple: Quick mixing and a single pan make the process straightforward, even after a busy day.
Ingredient Highlights

Choosing quality ingredients can elevate your Pink Coconut Snow Bars Recipe, especially when it comes to the flour and butter. Fresh eggs and pure vanilla make a noticeable difference too.
- All-purpose flour: Opt for a fresh, unbleached variety to keep bars tender and crumbly.
- Butter: Use unsalted and softened butter for even creaming and a pure buttery flavor.
- Sugar: Granulated sugar provides just the right sweetness and texture for these bars.
- Vanilla extract: Pure vanilla adds depth-don't substitute artificial versions if you can help it.

Quick Note: Exact measurements are in the printable recipe card at the bottom.
Step-by-Step for Pink Coconut Snow Bars Recipe
Step 1 - Prep & Season
Start by preheating your oven to 350°F (175°C) and greasing a 9×13-inch baking pan. This ensures your bars will release easily after baking. I like to lightly butter the pan and then dust it with a bit of flour, so those edges stay perfectly crisp without sticking. When creaming the butter and sugar, take your time until the mixture is light and fluffy-that's key for a tender crumb and a bit of lift.
Step 2 - Build Flavor
After creaming, add the eggs one at a time, mixing thoroughly between each addition. This slow incorporation helps create a stable batter you'll notice is glossy and smooth. Stir in the vanilla extract, which brings out the warmth and sweetness in the finished bars. Then, gently fold in the combined flour, baking powder, and salt mixture. I tend to sift my dry ingredients first for a fine, airy batter that bakes evenly, and I mix just until no dry streaks remain to avoid toughening the bars.
Step 3 - Finish for Best Texture
Pour the batter evenly into your prepared pan-it should spread out smoothly on its own. Bake for 25 to 30 minutes; you'll know they're ready when a toothpick inserted in the center comes out clean or with just a few moist crumbs. Let the bars cool completely in the pan before slicing to retain their shape and display those pretty pink layers. I've found that rushing this step can make the bars crumble, so patience here really pays off.
Kitchen Notes I Rely On
This recipe is forgiving if you stick to the mixing order and watch your baking time. I recommend measuring your flour by weight for consistency if you have a kitchen scale. Also, always cool completely before slicing-it transforms the bars from fragile to perfectly sliceable.
- Doneness Cue: Toothpick should come out clean or with few crumbs, not wet batter.
- Temperature Trick: Oven accuracy matters; try an oven thermometer if your bars bake unevenly.
- Make-Ahead Move: These bars keep well for days and actually taste better after resting overnight.
- Skip This Pitfall: Don't overmix once you add the flour, or the bars become dense and chewy instead of tender.
Serving & Sides

Finishing Touches
I love dusting these bars lightly with powdered sugar before serving-it's simple but adds a lovely snowy effect that matches their name. For an extra coconut kick, you might also sprinkle some toasted coconut flakes on top just before serving. These little details enhance both the look and flavor without complicating the recipe.
Pairs Nicely With
Pink Coconut Snow Bars go wonderfully with a cup of hot tea, especially lighter herbal blends or chai, which complement the gentle sweetness. For a richer dessert option, try serving them alongside a scoop of vanilla ice cream or a dollop of whipped cream to balance the textures.
Simple Plating Upgrades
If you want to dress them up for a casual party, arrange the bars on a platter with fresh berries or edible flowers for a pop of color. Wrapping individual bars in parchment paper tied with twine also makes for cute gifts or on-the-go treats that feel thoughtfully prepared.
Make-Ahead & Storage
Storing Leftovers
Store leftover Pink Coconut Snow Bars in an airtight container at room temperature for up to three days. If your kitchen is warm, the fridge is better, although this can slightly firm up the texture. They remain moist and flavorful either way, so pick what's most convenient for you.
Freezer Tips
These bars freeze beautifully-wrap individual squares tightly in plastic wrap and place them in a freezer-safe bag. They'll keep well for up to two months. When you want to enjoy, thaw at room temperature, and they'll be almost like freshly baked.
Reheating Pink Coconut Snow Bars Recipe Without Drying Out
To warm up the bars without drying, I recommend a low oven heat (around 300°F) for 8-10 minutes, wrapped loosely in foil to retain moisture. You can also microwave a bar for 10-15 seconds on a low setting, but watch closely to avoid overheating which can make them crumbly. An air fryer at low temperature is another quick option if you're short on time.
Frequently Asked Questions
Absolutely! Shredded coconut can be folded into the batter before baking or sprinkled on top before placing the pan in the oven. Just be mindful of adding too much, which may affect the texture slightly.
You can add a few drops of natural food coloring, such as beet juice or store-bought pink gel coloring, to the wet ingredients before mixing. The amount depends on how vibrant you want the bars to appear.
Yes, but I recommend using a trusted gluten-free flour blend designed for baking. Keep in mind the texture might differ slightly, perhaps a bit more delicate, so handle with care once baked.
You can substitute coconut oil, but the texture and flavor will shift. I like to use solid, refined coconut oil to keep a neutral taste and similar texture, but butter is best for that classic richness.
Final Thoughts
Making the Pink Coconut Snow Bars Recipe is like giving yourself a small gift-simple ingredients transformed into a soft, sweet treat that feels homemade and heartfelt. I hope you enjoy the process as much as the end result. Once you taste that buttery crumb and subtle coconut flavor, these bars will likely become part of your baking rotation, just like they have for me. Happy baking!
PrintPrintable Recipe
Pink Coconut Snow Bars Recipe
Pink Coconut Snow Bars are a delightful homemade treat combining a soft, buttery cake base with a subtle coconut flavor. These bars are perfect for dessert or an afternoon snack, featuring a tender crumb and a light sweetness that melts in your mouth. Easy to prepare with simple ingredients, they bake up moist and delicious, making them a crowd-pleaser for all occasions.
- Prep Time: 15 minutes
- Cook Time: 25 minutes
- Total Time: 40 minutes
- Yield: 12 bars
- Category: Dessert
- Method: Baking
- Cuisine: American
Ingredients
Dry Ingredients
- 2 cups all-purpose flour
- 1 teaspoon baking powder
- ¼ teaspoon salt
- 1 cup sugar
Wet Ingredients
- ½ cup softened butter
- 2 eggs
- 1 teaspoon vanilla extract
Instructions
- Preheat and Prepare Pan: Preheat your oven to 350°F (175°C) and grease a 9×13-inch baking pan thoroughly to prevent sticking.
- Cream Butter and Sugar: In a mixing bowl, cream together the softened butter and sugar using a hand mixer or stand mixer until the mixture becomes light in color and fluffy in texture.
- Add Eggs and Vanilla: Beat in the eggs one at a time, ensuring each egg is fully incorporated before adding the next, then mix in the vanilla extract until the mixture is smooth.
- Combine Dry Ingredients: In a separate bowl, whisk together the all-purpose flour, baking powder, and salt to evenly distribute the leavening and salt.
- Mix Wet and Dry Ingredients: Gradually fold the dry ingredients into the wet mixture. Stir gently until just combined to form a smooth batter without overmixing.
- Pour and Bake: Pour the batter into the prepared baking pan, spreading it out evenly. Place it in the oven and bake for 25 to 30 minutes, or until a toothpick inserted in the center comes out clean.
- Cool and Serve: Remove the pan from the oven and allow the bars to cool completely on a wire rack before cutting into squares and serving.
Notes
- Make sure the butter is softened to room temperature for better creaming with the sugar.
- Do not overmix the batter once the flour is added to avoid a tough texture.
- You can add shredded coconut on top or into the batter for enhanced coconut flavor.
- Store the bars in an airtight container at room temperature for up to 3 days.
- For a festive look, consider drizzling melted pink icing or sprinkling with desiccated coconut.


Leave a Reply