The No-Bake Oreo Balls Recipe is a deliciously simple dessert that you can whip up in no time, perfect for when you want a quick treat without turning on the oven. I often make these for family gatherings or just a cozy weekend indulgence because the creamy center paired with the glossy chocolate coating is absolutely irresistible. Plus, they are a crowd-pleaser that looks impressive with very little fuss.
Jump to:
Why You'll Make This on Repeat
There's something so satisfying about a no-bake dessert that delivers on both ease and indulgence. This recipe is that perfect balance-rich, creamy Oreo centers coated in luscious chocolate that set beautifully without any baking stress.
- Reliable Texture: The cream cheese binds the finely ground Oreo crumbs into a smooth, firm dough that's easy to shape.
- Balanced, Cozy Flavor: The sweet Oreo cream mixed with cream cheese offers a mellow filling, perfectly complemented by the chocolate shell.
- Pantry-Friendly: Just a few common ingredients, including Oreo cookies and cream cheese, make this a go-to anytime recipe.
- Weeknight Simple: Since there's no baking, you can have these ready to chill and enjoy within an hour.
Ingredient Highlights

For the best No-Bake Oreo Balls Recipe, ingredient quality really shines through. I recommend using fresh Oreo cookies and good-quality cream cheese for ideal texture and flavor. When it comes to chocolate, pick your favorite-each type offers a slightly different finish.
- Oreo Cookies: Make sure they're fresh and crunchy; avoid flavored variations for the classic taste.
- Cream Cheese: Use full-fat, softened brick-style cream cheese for smooth mixing and richness.
- Chocolate: Choose semi-sweet, milk, or white chocolate blocks or chips depending on your preference, but ensure they're good quality for a glossy coating.

Quick Note: Exact measurements and timing details are conveniently listed in the printable recipe card below for easy reference.
Step-by-Step for No-Bake Oreo Balls Recipe
Step 1 - Prep & Season
Begin by processing your Oreo cookies into fine crumbs. I like to use a food processor because it's quick and gets everything perfectly even, but a zip-top bag and rolling pin work just as well if you don't have one. Aim for a dark, powdery texture without large chunks-this ensures the mixture will hold together seamlessly without feeling gritty.
Step 2 - Build Flavor
Transfer those Oreo crumbs to a mixing bowl and add the softened cream cheese. I prefer using a sturdy spatula or wooden spoon to blend the two until you get a uniform mixture without any dry spots. It should be smooth and pliable, almost dough-like, which signals it's ready to shape. This step is crucial for that creamy center you'll enjoy with every bite.
Step 3 - Finish for Best Texture
Now scoop the mixture, about a tablespoon each, and roll into 1-inch balls. Place them on parchment paper and chill in the fridge at least 30 minutes. This firming up is key because it makes dipping easier and the finished texture smooth and satisfying. When dipping, melt your choice of chocolate slowly and thoroughly-warm but not hot-so it coats the balls without clumping.
Kitchen Notes I Rely On
Over time, I found a few tricks to make the No-Bake Oreo Balls Recipe foolproof and enjoyable every time. From temperature tips to storage hacks, these notes save me from second-guessing or last-minute fixes.
- Doneness Cue: The mixture should feel firm but pliable, not sticky or crumbly before forming balls.
- Temperature Trick: Let melted chocolate cool slightly so it's fluid but won't melt the cream cheese center during dipping.
- Make-Ahead Move: You can prepare and shape balls a day ahead; store them covered in the fridge to keep fresh.
- Skip This Pitfall: Avoid rushing chilling time as under-chilled balls will fall apart when dipped.
Serving & Sides

Finishing Touches
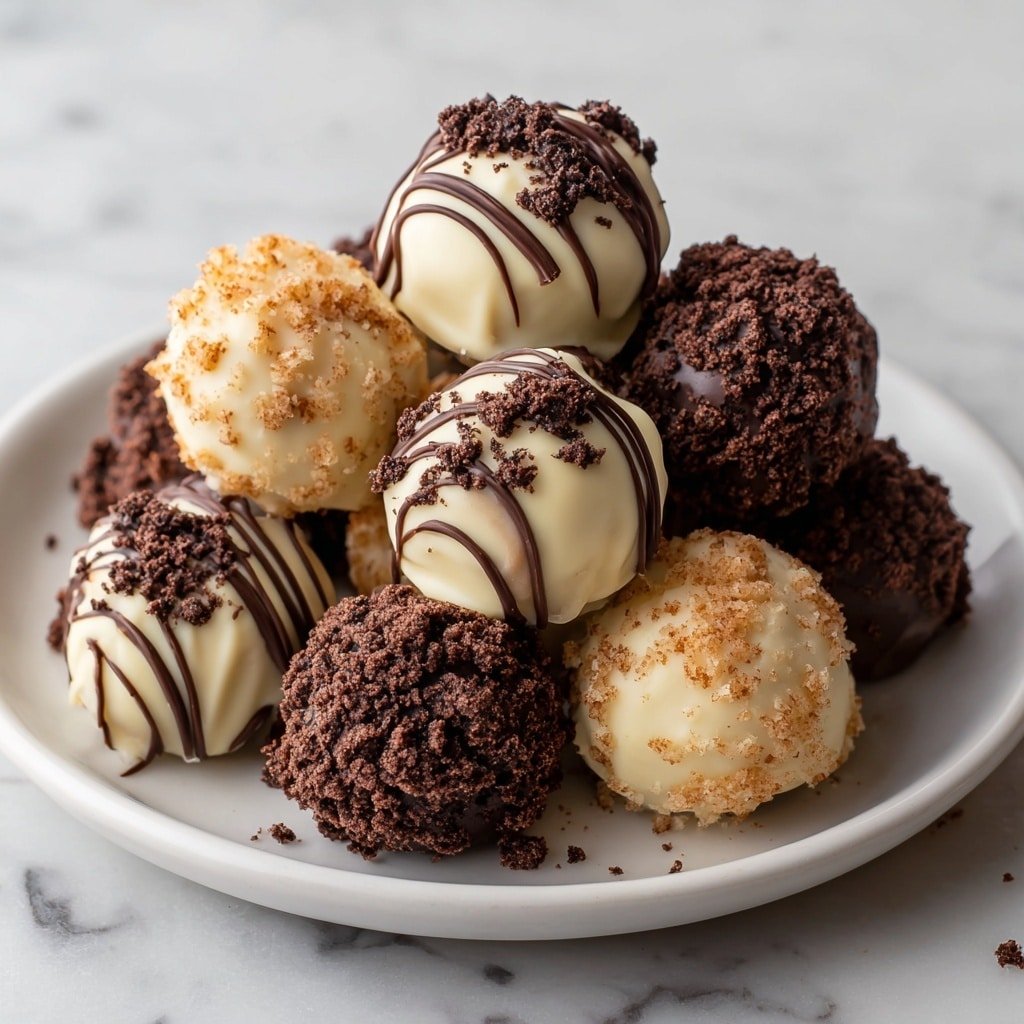
I love adding a little flair by drizzling contrasting chocolate over the set balls or sprinkling with colored sugar or mini chocolate chips. These finishing touches add texture and visual appeal without complicating your no-bake process. Plus, it's fun to personalize them for holidays or parties.
Pairs Nicely With
These Oreo balls are delightful alongside a warm cup of coffee or rich hot chocolate, balancing sweetness and giving a pleasant contrast in temperature. For a party, I often serve them with fresh fruit or a light, tart berry compote to cut through the richness.
Simple Plating Upgrades
For a casual weeknight, presenting on a simple white plate with parchment paper works just fine. For a special occasion, try stacking the balls on a tiered dessert stand or placing them in pretty mini cupcake liners for individual servings. Just a small effort makes the treat feel extra festive.
Make-Ahead & Storage
Storing Leftovers
Keep leftover Oreo balls in an airtight container in the refrigerator. They will stay fresh and firm for up to 5 days. You'll notice the texture remains creamy inside with a crisp chocolate shell if stored properly.
Freezer Tips
These no-bake treats freeze wonderfully. Place the balls on a tray, freeze until solid, then transfer to a freezer-safe container or bag. They maintain flavor and texture well for up to 3 months. Thaw in the fridge overnight for best results, so they don't sweat or soften too quickly.
Reheating No-Bake Oreo Balls Recipe Without Drying Out
Since these are best served chilled, reheating isn't usually necessary. If you prefer them softer, briefly warm in the microwave for 5-7 seconds, but watch closely to avoid melting the chocolate coating. Alternatively, a quick air-fryer blast at low temp for 1-2 minutes can soften without drying them out.
Frequently Asked Questions
While you can, full-fat cream cheese gives the best creamy texture and flavor. Reduced-fat options may make the mixture less smooth and dryer.
At least 30 minutes in the fridge is ideal to ensure they're firm enough to dip without breaking apart.
Semi-sweet chocolate offers a classic pairing, but milk or white chocolate provide sweeter, smoother options. Choose one you love; all work beautifully.
They're best stored in the refrigerator to keep the cream cheese center safe and the chocolate coating firm.
Final Thoughts
I genuinely love how this No-Bake Oreo Balls Recipe transforms just a handful of pantry staples into a luscious, gourmet-feeling treat without breaking a sweat. The ease and flexibility make it something I turn to often, whether for a casual snack or a last-minute party dessert. I hope you enjoy the process as much as the delicious results-you'll be making these again and again as I do!
PrintPrintable Recipe
No-Bake Oreo Balls Recipe

Indulge in these Easy Oreo Balls, a decadent no-bake treat perfect for any occasion. Combining crushed Oreo cookies with creamy brick-style cream cheese, these bite-sized delights are dipped in rich melted chocolate for an irresistible finish. Ready in under an hour, these no-fuss dessert balls make a classic crowd-pleaser that's both simple and delicious.
- Prep Time: 15 minutes
- Cook Time: 0 minutes
- Total Time: 50 minutes
- Yield: 36 to 40 Oreo Balls
- Category: Dessert
- Method: No-Cook
- Cuisine: American
- Diet: Vegetarian
Ingredients
Oreo Balls
- 36 regular Oreo cookies
- 1 (8-ounce) package brick-style cream cheese, softened
Chocolate Coating
- 16 ounces semi-sweet chocolate
- or 16 ounces milk chocolate
- or 16 ounces white chocolate
Instructions
- Crush the Oreos: Process 36 regular Oreo cookies until they are reduced to fine crumbs using a food processor or by placing them in a sealed zip-top bag and crushing them with a rolling pin. This ensures a uniform texture that blends well with cream cheese.
- Mix with cream cheese: Transfer the Oreo crumbs to a medium mixing bowl. Add 1 (8-ounce) package of softened brick-style cream cheese. Mix thoroughly with a spoon or spatula until the mixture forms a cohesive, dough-like consistency with no dry pockets of crumbs.
- Form the balls: Scoop about one tablespoon of the mixture and roll it between your palms to form compact balls approximately 1 inch in diameter. Place each ball onto a baking sheet lined with parchment or wax paper. Continue until all mixture is shaped, yielding 36 to 40 balls.
- Chill the balls: Refrigerate the baking sheet with Oreo Balls for at least 30 minutes to firm up the mixture. Chilling is essential for easy handling and dipping in chocolate.
- Melt the chocolate: Choose your preferred chocolate: semi-sweet, milk, or white. Melt 16 ounces using a double boiler or microwave at 50% power in 30-second intervals, stirring until smooth. Allow the chocolate to cool slightly to prevent melting the balls during dipping.
- Dip the Oreo balls: Using a fork or toothpick, dip each chilled ball into the melted chocolate, coating completely. Lift, let excess chocolate drip off, and gently tap on the bowl's edge to remove extra coating. Place back on the parchment-lined baking sheet. Optionally, drizzle contrasting chocolate or add sprinkles while coating is wet.
- Set the chocolate coating: Let the chocolate harden completely at room temperature or refrigerate the baking sheet for 15-20 minutes for faster setting.
Notes
- Use brick-style cream cheese for best texture-avoid whipped or spreadable types.
- Chilling the balls before dipping prevents them from falling apart during coating.
- Melt chocolate gently to avoid burning and keep smooth.
- Store finished Oreo balls in the refrigerator for up to one week.
- For variety, experiment with different chocolate types or toppings such as crushed nuts or sprinkles.


Leave a Reply