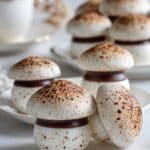
If you're dreaming of a whimsical dessert that doubles as an eye-catching centerpiece, this Meringue Mushrooms Recipe is just the thing. Perfect for festive gatherings or anytime you want to impress without stress, these delicate, toasty meringue mushrooms bring a touch of forest magic to your table. Light, crisp, and beautifully glossy, they're a joy to make and even more fun to share.

Jump to:
Why You'll Make This on Repeat
I fall back on this Meringue Mushrooms Recipe whenever I want a dessert that's both festive and fuss-free. They're surprisingly simple, yet the look and texture are so unique and charming that guests always ask for the secret. Plus, they store well and complement a variety of holiday spreads or casual teatimes alike.
- Reliable Texture: Achieve glossy, crisp, yet tender mushrooms that hold their shape perfectly.
- Balanced, Cozy Flavor: Subtle sweetness paired with a hint of cocoa brings warmth without overpowering.
- Pantry-Friendly: Made from simple ingredients you likely already have: egg whites, sugar, and cocoa.
- Weeknight Simple: Piping and baking them requires minimal active time and little stress.
Ingredient Highlights

When assembling this Meringue Mushrooms Recipe, quality eggs and fine powdered sugar make a surprisingly big difference in the final texture. Freshness and temperature matter, especially for the egg whites, to ensure your meringue whips up shiny and holds stiff peaks.
- Egg Whites: Use large, room-temperature eggs for maximum volume and stable meringue structure.
- Powdered Sugar: Make sure it's finely sifted to help the sugar dissolve completely and keep the meringue smooth.
- Cocoa Powder: Choose unsweetened, high-quality cocoa for dusting to add an earthy depth and realistic mushroom look.
- Dark Chocolate: Opt for 60-70% cocoa content for a rich but not bitter finish that secures caps and stems beautifully.
Quick Note: Exact measurements are in the printable recipe card at the bottom.
Step-by-Step for Meringue Mushrooms Recipe
Step 1 - Prep & Season
First, preheat your oven low and slow at 210°F (100°C) and line a baking sheet with parchment. This low temperature is what turns your meringue into crisp mushrooms that keep their shape rather than browning too quickly. Place your room-temp egg whites and powdered sugar in a clean metal bowl set over a simmering bain-marie. Whisk gently until the mix feels fragrant and warm to the touch - roughly the temperature of your fingertip. This soft warming helps the sugar fully dissolve, which is the secret to that glossy, stable meringue you want to pipe easily.
Step 2 - Build Flavor
Once warm, remove from heat and whisk the mix on high speed until the bowl cools completely and peaks form just right - glossy and firm, not dry. This Swiss meringue base is incredibly silky, lending itself perfectly to those mushroom stems and caps. Transfer the meringue to a piping bag fitted with a ½" round tip. Pipe small dots in the corners of your baking sheet to pin down the parchment-no slipping during baking! Then pipe stems upright and mushroom caps individually, practicing a slight pulling motion to create that delicate pointed stem tip. I like to keep the size around 1 to 2 inches for caps and about 1 inch for stems to balance the look and bake evenly.
Step 3 - Finish for Best Texture
Give your mushroom caps a light dusting of cocoa powder before they head into the oven. Bake for a full hour at that low temp so they dry out slowly, turning crisp without cracking or browning too fast. Patience here builds the perfect snap and delicate crunch you want. After baking, let them cool fully on the parchment; they'll pull away easily. When it's time to assemble, melt your dark chocolate gently and either dip stem tips and spread caps to connect, or make a small hole in the caps to secure the stems with melted chocolate inside. Place assembled mushrooms upside down on parchment and allow the chocolate to set-this keeps your stems perfectly straight and your caps looking glossy.
Kitchen Notes I Rely On
From my experience, those little moments of care around temperature and texture make all the difference with this Meringue Mushrooms Recipe. I recommend using a good stand mixer if you have one-it really takes the elbow grease out of beating the meringue to stiff peaks. Also, don't rush the baking; low and slow will give you the best shelf life and that almost ethereal crunch.
- Doneness Cue: The meringue should feel dry and crisp when lightly touched, not sticky or soft.
- Temperature Trick: Ensure egg whites are at room temperature to whip up better volume and stability.
- Make-Ahead Move: These can be baked up to a week ahead and stored cool in an airtight container.
- Skip This Pitfall: Avoid introducing any grease or yolk into egg whites, which can prevent proper whipping.
Serving & Sides

Finishing Touches
To elevate your meringue mushrooms visually, I love dusting a final generous sprinkle of cocoa powder once assembled. It adds an earthiness and a freshly "dug up" forest feel that's simply delightful. Sometimes, a tiny sprinkle of edible glitter adds a soft magical shimmer for holiday occasions if you're feeling playful.
Pairs Nicely With
These mushrooms shine on their own but also pair wonderfully with rich whipped cream, fresh berries, or alongside a rustic chocolate tart. On the savory side, they make a whimsical garnish for mushroom risotto or a simple hot chocolate bar centerpiece. Their crispness contrasts nicely with creamy, soft textures.
Simple Plating Upgrades
For a quick update, place your mushrooms upright on a bed of cocoa-dusted powdered sugar or crushed toasted nuts. Alternatively, piping some mint-flavored whipped cream around the edges adds a refreshing color contrast and gentle herbal note that complements the sweet, chocolaty finish.
Make-Ahead & Storage
Storing Leftovers
Store your meringue mushrooms in an airtight container at room temperature or in a cool spot-not in the fridge where humidity can soften them. They keep well for up to a week, remaining crisp and visually striking, so feel free to prepare ahead for your event.
Freezer Tips
You can freeze these beautifully by placing them in a well-sealed container with parchment layers to prevent sticking. Thaw at room temperature, uncovered, to maintain their crisp texture. While freezing may dull the chocolate a bit, the mushrooms themselves hold up well.
Reheating Meringue Mushrooms Recipe Without Drying Out
If you'd like to refresh the texture, briefly warm them in a low oven (about 200°F/93°C) for 5-7 minutes. Avoid microwaving since it can soften and ruin the crunch. Using an air fryer on low heat also works nicely for a minute or two, but keep an eye on them-they crisp quickly!
Frequently Asked Questions
Powdered sugar dissolves more easily into the egg whites, leading to a smoother, glossy meringue. Granulated sugar may not dissolve fully, resulting in a gritty texture. If you only have granulated, pulse it in a blender to make superfine sugar before using.
Cracks usually happen if the oven temperature is too high or if the meringue dries too fast. Baking low and slow at 210°F (100°C) ensures gentle drying that prevents cracks and maintains a crisp, smooth surface.
While piping bags provide the best control, you can use a plastic bag with a small hole cut in the corner or a spoon to dollop shapes carefully. Just remember that the shapes might be less uniform.
Make sure your bowl and whisk are impeccably clean, free from any oils or grease. Also, bake them fully until dry to the touch, and store in airtight containers away from humidity.
Final Thoughts
I love that the Meringue Mushrooms Recipe marries simple ingredients with a bit of whimsy and patience to create something so beautiful and delicious. Whether for a festive table or a special treat, they're a testament to how a little technique transforms basic meringue into a magical woodland confection. I'm confident once you try this, it'll become a charming go-to in your baking repertoire-just like it did for me.
PrintPrintable Recipe
Meringue Mushrooms Recipe
Delightful and whimsical Swiss meringue mushrooms made with whipped egg whites and powdered sugar, baked to perfection and assembled with rich dark chocolate and a dusting of cocoa powder. These charming treats are perfect for festive occasions or as a creative dessert garnish.
- Prep Time: 20 minutes
- Cook Time: 1 hour
- Total Time: 1 hour 30 minutes
- Yield: 20 mushrooms
- Category: Dessert
- Method: Baking
- Cuisine: French
- Diet: Vegetarian
Ingredients
Swiss Meringue
- 4 large egg whites, room temperature
- 2 cups (250 g) powdered (icing) sugar
For the Finish
- 1 tablespoon cocoa powder
- 2 oz (60 g) dark chocolate
Instructions
- Preheat Oven and Prepare Baking Sheet. Preheat the oven to 210°F (100°C) and line a baking sheet with parchment paper to prevent sticking and facilitate easy removal of the meringue shapes.
- Make the Swiss Meringue. Place the egg whites in a clean bowl and add powdered sugar. Whisk a few times to combine. Heat the bowl over a bain-marie or water bath, whisking continuously until the mixture becomes foamy and hot to the touch.
- Whip Meringue to Stiff Peaks. Remove from heat and beat the mixture with a stand or electric mixer until it cools completely and forms glossy, stiff peaks.
- Prepare Piping Bag and Fix Parchment Paper. Transfer the meringue to a large piping bag fitted with a ½ inch (12 mm) round tip. Pipe four small dots in the corners of the baking sheet to secure the parchment paper during baking.
- Pipe Mushroom Stems. Hold the piping bag upright and gently pipe the mushroom stems by squeezing to form a base and lifting to create a pointed tip.
- Pipe Mushroom Caps. Pipe rounded mushroom caps by squeezing the bag upright, forming smooth domes about 1 to 2 inches (2.5 to 5 cm) wide and approximately 1 inch (2.5 cm) tall. Use a wet fingertip to flatten any sharp peaks on the caps if needed. Space caps and stems about 1 inch (2.5 cm) apart.
- Sprinkle Cocoa Powder and Bake. Lightly dust the mushroom caps with cocoa powder for a natural earth effect. Bake the caps and stems in the preheated oven for 1 hour.
- Cool and Detach Meringues. After baking, let the meringues cool completely on the baking sheet and carefully lift them off the parchment paper.
- Melt Dark Chocolate. Melt the dark chocolate using a double boiler or microwave until smooth and glossy, ready for assembly.
- Assemble Meringue Mushrooms - Method 1. Trim the tops of the mushroom stems evenly with a serrated knife. Use a small offset spatula to coat the bottom of each cap with the melted chocolate. Dip the tip of each stem into the chocolate and twist gently to attach the cap and stem. Place the assembled mushrooms upside down on a parchment-lined wire rack and allow the chocolate to set.
- Assemble Meringue Mushrooms - Method 2. Alternatively, make a small hole at the bottom center of each cap with a paring knife. Fill the hole and top of the stems with melted chocolate, then insert the stems into the caps. Place mushrooms upside down and refrigerate to set the chocolate.
- Final Cocoa Powder Dusting. Once assembled and set, sprinkle cocoa powder lightly over the upright meringue mushrooms to emulate the appearance of mushrooms freshly growing from soft earth.
Notes
- Use room temperature egg whites to achieve the best volume and stability in the meringue.
- Ensure no grease or yolk traces are in the egg whites to get stiff peaks.
- The low oven temperature is crucial for drying out the meringue without browning.
- Use a silicone mat instead of parchment paper if preferred, but secure it well before piping.
- For a more intense chocolate flavor, use high-quality dark chocolate with at least 70% cocoa.
- Be gentle when assembling to avoid breaking the delicate meringue pieces.
- If meringue spikes form on caps, smooth them with a wet fingertip before baking.
- Store assembled mushrooms in an airtight container at room temperature to prevent moisture softening.


Leave a Reply