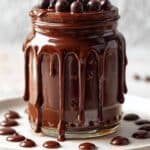
Whenever I want a luscious drizzle for my ice cream or an indulgent dip for fresh fruit, I turn to my Homemade Chocolate Sauce Recipe. It's simple, quick, and has that rich, glossy finish you just don't get from store-bought sauces. Whether you're freshening up a weeknight dessert or prepping for a sweet surprise, this sauce makes everything better.

Jump to:
Why You'll Make This on Repeat
This homemade chocolate sauce is a game changer, especially when you want a no-fuss, reliable treat that elevates everyday desserts. I love how it balances sweetness and cocoa richness without overpowering your palate-comfort in a spoon.
- Reliable Texture: silky smooth and glossy, not grainy or thickened too much
- Balanced, Cozy Flavor: deep chocolate notes mingled with subtle vanilla warmth
- Pantry-Friendly: uses just a handful of common ingredients you likely have on hand
- Weeknight Simple: comes together in about 10 minutes, perfect for last-minute cravings
Ingredient Highlights

Using quality ingredients is key to a standout homemade chocolate sauce. I always reach for natural cocoa powder and real vanilla for that authentic depth, and making sure the sugar dissolves well ensures the sauce is silky smooth.
- Unsweetened Cocoa Powder: Choose a natural or Dutch-processed variety to suit your preference; Dutch process is milder and darker.
- Granulated Sugar: Standard white sugar works best to dissolve evenly and avoid grit.
- Water: Plain water keeps the sauce light; you can experiment with milk or cream but that's a different recipe.
- Vanilla Extract: Fresh, pure vanilla extract adds subtle warmth and lifts the chocolate flavor beautifully.

Quick Note: Exact measurements are in the printable recipe card at the bottom.
Step-by-Step for Homemade Chocolate Sauce Recipe
Step 1 - Prep & Season
Start by whisking together your dry ingredients-cocoa powder, sugar, and salt-in a medium saucepan. This helps prevent lumps and ensures an even flavor base. You'll notice a rich, chocolatey aroma even before adding liquid, which is always a good sign. Taking a moment here makes all the difference for a smooth sauce.
Step 2 - Build Flavor
Slowly pour in the water while whisking over medium heat. Keep stirring to dissolve the sugar completely and create a glossy mixture. Once it begins to shimmer and bubbles appear at the edges, bring it to a gentle boil but don't walk away-it can scorch easily. Stirring constantly prevents burning and keeps your sauce silky.
Step 3 - Finish for Best Texture
Reduce heat to low and simmer for about 5 minutes. The sauce will thicken just enough to coat the back of a spoon with a shiny veil. Remove from heat and stir in the vanilla extract off the heat-it brightens the chocolate and adds warmth. Let it cool slightly if you want a thicker sauce or serve it warm for drizzling immediatley.
Kitchen Notes I Rely On
Over the years of making this Homemade Chocolate Sauce Recipe, I've learned that patience and attention to heat are key to perfection. Watch your sauce closely during simmering-too high and it scorches; too low and it won't thicken well.
- Doneness Cue: Sauce should coat a spoon with a shiny, slightly thickened consistency.
- Temperature Trick: Keep heat medium to low-never rush it with high heat to avoid bitterness.
- Make-Ahead Move: Sauce holds well in the fridge and can be gently reheated with a splash of water.
- Skip This Pitfall: Avoid adding vanilla too early; heat can burn off its delicate aroma and flavor.
Serving & Sides
Finishing Touches
A quick stir before serving brings back the glossiness, and a splash more vanilla or a sprinkle of flaky sea salt can add extra interest. I love adding a small pat of butter before serving for a silky richness that melts beautifully over warm desserts.
Pairs Nicely With
This sauce is incredibly versatile. You'll enjoy it drizzled over vanilla ice cream, toasted pound cake, fresh berries, or even stirred into a cup of hot milk for an instant chocolatey treat. It's also wonderful with roasted nuts and whipped cream for extra texture and flavor contrast.
Simple Plating Upgrades
For an easy weeknight upgrade, drizzle the sauce in a zigzag pattern over bowls of fruit or cheesecake slices. On special occasions, try swirling some into dollops of whipped cream or serving alongside a sprinkle of crushed nuts or edible flowers for a delicate touch.
Make-Ahead & Storage
Storing Leftovers
Store your leftover sauce in an airtight container or jar in the fridge. It keeps well for up to two weeks, but you might notice it thickens as it cools. Don't worry-that's easy to fix with a quick stir or gentle warm-up.
Freezer Tips
This Homemade Chocolate Sauce Recipe freezes nicely. Freeze in a sealed container or silicone ice cube trays to portion easily. Thaw overnight in the fridge, then warm gently. Keep in mind texture may shift slightly, but a good whisk brings it back.
Reheating Homemade Chocolate Sauce Recipe Without Drying Out
Reheat gently in a microwave at 20-second intervals, stirring in between to prevent scorching. If using the stovetop, warm over low heat with a splash of water to loosen it up. Avoid high heat or prolonged reheating to keep the sauce glossy and smooth.
Frequently Asked Questions
Yes, substituting milk or cream will give you a richer, creamier sauce, but it will change the texture and calorie content. Water keeps it lighter and more versatile.
Graininess usually happens if the sugar doesn't fully dissolve or if the sauce overheats. Whisking constantly and controlling heat carefully helps ensure smoothness.
It should be thin enough to drizzle but thick enough to coat a spoon lightly. The sauce will thicken more as it cools, so keep that in mind while cooking.
Sometimes, a bit of separation occurs. Just give it a stir or gently reheat to bring it back to a uniform texture without issue.
Final Thoughts
This Homemade Chocolate Sauce Recipe quickly became my go-to when I want a rich chocolate boost without fuss or artificial ingredients. Beyond the classic vanilla and cocoa flavor combo, feel free to add a pinch of chili or espresso powder for an adventurous twist. Once you try making this sauce, you'll see why it's so comforting and endlessly useful-it's truly a recipe worth repeating and sharing.
PrintPrintable Recipe
Homemade Chocolate Sauce Recipe
This homemade chocolate sauce is a rich, smooth, and versatile topping perfect for enhancing desserts like ice cream, cakes, and fruit. Made from simple pantry staples including cocoa powder, sugar, and vanilla, it comes together quickly on the stovetop and can be stored for convenient use over two weeks.
- Prep Time: 5 minutes
- Cook Time: 10 minutes
- Total Time: 15 minutes
- Yield: About 1 ¼ cups
- Category: Sauce
- Method: Stovetop
- Cuisine: American
Ingredients
Chocolate Sauce Ingredients
- 1 cup unsweetened cocoa powder
- 1 cup granulated sugar
- 1 cup water
- ¼ teaspoon salt
- 1 teaspoon vanilla extract
Instructions
- Combine Dry Ingredients: In a medium saucepan, whisk together the cocoa powder, sugar, and salt until fully blended to ensure an even mixture.
- Add Water and Heat: Pour in the water gradually while whisking over medium heat. Continue whisking until the mixture is smooth and it begins to gently boil, making sure to stir constantly to avoid burning.
- Simmer the Sauce: Lower the heat to a simmer and cook for 5 minutes, stirring continuously. The sauce will thicken slightly and develop a glossy texture during this step.
- Finish with Vanilla: Remove the pan from heat and stir in the vanilla extract to impart a rich aroma and flavor to the chocolate sauce.
- Cool or Serve Warm: Allow the sauce to cool before storing in an airtight container in the refrigerator for up to 2 weeks, or drizzle it warm directly over your favorite desserts.
Notes
- Stir continuously while boiling and simmering to prevent the sauce from burning or clumping.
- The sauce thickens more as it cools; reheat gently if needed before serving.
- Store the sauce in the refrigerator in a sealed container and rewarm slightly before using.
- Adjust sweetness by reducing sugar if a less sweet sauce is preferred.


Leave a Reply