The Cookie Monster Ice Cream Recipe is a fun and colorful treat that brings together creamy blue ice cream with crunchy cookie chunks. It's perfect for summer afternoons, birthday parties, or whenever you want a delightful twist on classic ice cream. Making it at home lets you customize the cookies and colors to your liking, turning an ordinary dessert into a playful delight.

Jump to:
Why You'll Make This on Repeat
This Cookie Monster Ice Cream blends smooth creaminess with bold blue color and the irresistible crunch of your favorite cookies. It's a unique dessert that's both visually playful and satisfyingly rich, making it a family favorite fast.
- Reliable Texture: Creamy and soft with cookie pieces perfectly suspended throughout without sinking or becoming soggy.
- Balanced, Cozy Flavor: The vanilla base balances the sweetness of cookies, so it's never overpowering.
- Pantry-Friendly: Uses common baking staples and lets you swap cookies based on what you have on hand.
- Weeknight Simple: Minimal prep, especially if you have an ice cream maker ready to go.
Ingredient Highlights

Choosing your ingredients thoughtfully really sets this Cookie Monster Ice Cream Recipe apart. I like to use high-quality cream and fresh cookies for the best texture and flavor, but there's plenty of room for customization depending on your preferences.
- Heavy Cream: Use full-fat for creaminess; it makes the ice cream luscious and smooth.
- Milk: Whole milk works best, but dairy-free alternatives like almond or oat milk add a different twist.
- Vanilla Extract: Pure vanilla adds depth and warmth-don't substitute with artificial flavors.
- Crushed Cookies: Freshly crushed chocolate chip and Oreos give both texture and visual contrast.
- Blue Food Coloring: Start with a drop or two, adding gradually so you don't overwhelm the flavor.

Quick Note: Exact measurements and full method details are at the end for easy printing!
Step-by-Step for Cookie Monster Ice Cream Recipe
Step 1 - Prep & Season
Begin by whisking together the heavy cream, milk, sugar, and vanilla extract until the sugar is fully incorporated and the mixture feels smooth to the touch. It should have a silky consistency without any graininess. Gradually add blue food coloring a drop at a time until you reach that perfect glossy Cookie Monster blue. I often stop just before it's too bright to keep the flavor front and center.
Step 2 - Build Flavor
Pour the blue cream mixture into your ice cream maker and churn according to the manufacturer's instructions. After about 20 minutes, when the ice cream has thickened to a soft-serve consistency, gently fold in the crushed chocolate chip and Oreo cookies. This timing ensures the cookies stay chunky and flavorful without getting soggy or breaking down too much.
Step 3 - Finish for Best Texture
Transfer the churned ice cream to a freezer-safe container, spreading it evenly with a spatula. Allow it to freeze for at least 4 to 6 hours so the texture fully firms up but remains scoopable. Avoid freezing longer than necessary to keep it creamy and avoid icy crystals. When you're ready, take it out a few minutes before scooping to loosen it slightly.
Kitchen Notes I Rely On
Through making this Cookie Monster Ice Cream Recipe multiple times, I've learned that timing and gentle handling of mix-ins really make a difference in texture and presentation.
- Doneness Cue: Ice cream should look thick and coat the paddle of your ice cream maker when ready.
- Temperature Trick: Chill your base mixture in the fridge before churning to speed up freezing time and improve creaminess.
- Make-Ahead Move: You can prepare the base a day ahead and store it refrigerated for deeper flavor.
- Skip This Pitfall: Don't add cookies too early in churning, or they'll become mushy and lose that satisfying crunch.
Serving & Sides
Finishing Touches
I love topping my Cookie Monster Ice Cream with a little whipped cream and a sprinkle of mini cookie crumbles for an extra layer of texture and festive flair. The creaminess of the whipped topping complements the dense cookie chunks perfectly, making every spoonful a complete treat. You can also drizzle a bit of chocolate or caramel sauce, but often simpler is better to let that blue vanilla shine.
Pairs Nicely With
This ice cream pairs wonderfully with fresh berries like raspberries or strawberries, which add a bright contrast. For a cozy pairing, serve alongside warm brownies or a lightly toasted waffle. The warmth of the dessert against the cold ice cream is one of my favorite contrasts to enjoy together.
Simple Plating Upgrades
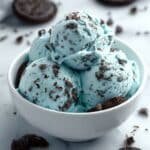
For a quick styling upgrade, serve scoops in clear glass bowls to show off that stunning blue color. Add a sprig of mint or edible flowers to elevate the look for parties. If you're serving kids, a colorful spoon or fun bowl really adds to the experience and makes this ice cream even more irresistible.
Make-Ahead & Storage
Storing Leftovers
Keep leftover ice cream in an airtight, freezer-safe container to prevent ice crystals and flavor loss. Store it in the coldest part of your freezer and enjoy within 1-2 weeks for the best taste and texture. When you scoop it later, it should remain creamy if thawed properly.
Freezer Tips
This Cookie Monster Ice Cream Recipe freezes really well thanks to the rich cream base. For best quality, cover the surface with plastic wrap before sealing the container to minimize ice formation. Thaw on the counter for 5 to 10 minutes before serving to reach that perfectly soft scoopable texture.
Reheating Cookie Monster Ice Cream Recipe Without Drying Out
Since this is an ice cream, reheating isn't typical, but if you want to soften it quickly without melting too much, microwave in short 10-second bursts at low power. Keep an eye on it and stir gently between bursts to preserve creaminess. An air fryer is not recommended here as it can unevenly melt the ice cream.
Frequently Asked Questions
Yes, you can! Simply freeze the mixture in a shallow dish and stir vigorously every 30 minutes as it freezes to break up ice crystals. It won't be quite as smooth, but still delicious.
I like putting them in a zip-top bag and gently tapping with a rolling pin to get uneven chunks. Avoid pulverizing into dust; a mix of small and medium pieces adds great texture.
Natural blues are tricky to achieve, but butterfly pea powder can provide a soft blue hue. Just remember color intensity may vary and could subtly affect flavor.
Add the crushed cookies in the last few minutes of churning so they coat with ice cream but don't have time to get soggy during freezing.
Final Thoughts
I always find making this Cookie Monster Ice Cream Recipe to be a joyful, almost nostalgic experience. It's like bringing a bit of playful whimsy to the kitchen that you can share with your family and friends. Once you try it, you'll notice how it's easy to make your own with different cookies and color intensities. I hope you enjoy making this fun treat as much as I do!
PrintPrintable Recipe
Cookie Monster Ice Cream Recipe
Experience a fun and delicious twist on homemade ice cream with this Delightful Cookie Monster Ice Cream recipe. Featuring a creamy blue base infused with vanilla and packed with crushed chocolate chip and Oreo cookies, this sweet treat is perfect for dessert lovers looking for a playful flavor adventure. Easy to prepare with an ice cream maker and customizable for dairy-free options, this recipe promises a cool, crunchy delight for cookie and ice cream fans alike.
- Prep Time: 10 minutes
- Cook Time: 25 minutes
- Total Time: 6 hours 30 minutes
- Yield: 6 servings
- Category: Dessert
- Method: Ice Cream Maker (Churning)
- Cuisine: American
Ingredients
Ice Cream Base
- 2 cups Heavy Cream (Can substitute with coconut cream for a dairy-free version)
- 1 cup Milk (Can substitute with almond or oat milk for a dairy-free alternative)
- ¾ cup Sugar (Consider using a sugar substitute if desired)
- 1 tablespoon Vanilla Extract (No substitutions recommended for flavor)
- 2-4 drops Blue Food Coloring (Start with a drop and adjust to desired hue)
Cookie Mix-ins
- 1 cup Crushed Chocolate Chip Cookies (Can replace with any favorite cookies)
- 1 cup Crushed Oreo Cookies (Interchangeable with any sandwich cookie)
Optional Toppings
- 1 cup Whipped Cream (Adds an extra festive touch)
- ½ cup Mini Cookie Crumbles (For decoration and crunch)
Instructions
- Prepare Ice Cream Base: In a large mixing bowl, whisk together the heavy cream, milk, sugar, and vanilla extract until the sugar is fully dissolved and the mixture is smooth.
- Add Coloring: Gradually add 2 to 4 drops of blue food coloring into the ice cream base, whisking continuously until you achieve your desired blue shade.
- Churn Ice Cream: Pour the blue-tinted mixture into your ice cream maker. Churn for 20 to 25 minutes or until the mixture reaches a soft-serve consistency.
- Add Cookie Mix-ins: During the last 5 minutes of churning, slowly add the crushed chocolate chip cookies and crushed Oreo cookies to evenly distribute them throughout the ice cream.
- Freeze for Firmness: Transfer the churned ice cream to a freezer-safe container. Cover and freeze for 4 to 6 hours to allow it to firm up and develop its full texture.
- Serve: Scoop the frozen ice cream into individual bowls. Optionally, top with whipped cream and sprinkle mini cookie crumbles on top for added texture and decoration. Enjoy your Cookie Monster Ice Cream adventure!
Notes
- For a dairy-free version, substitute heavy cream with coconut cream and milk with almond or oat milk.
- Use a sugar substitute if you prefer a lower sugar content.
- Adjust the amount of blue food coloring according to the desired vibrancy; start with fewer drops to avoid overpowering the flavor.
- If you do not have an ice cream maker, you can freeze the mixture in a shallow dish and stir every 30 minutes for 3 hours to mimic churning.
- Store ice cream in an airtight container to prevent freezer burn and preserve freshness.


Leave a Reply