If you're searching for a festive, delicious treat this holiday season, this Christmas Tree Cupcakes Recipe is a perfect choice. These cupcakes are as fun to make as they are to eat, especially when you want a cheerful dessert that brings a bit of holiday magic to your kitchen. Whether you're baking for a Christmas party or a cozy family gathering, these cupcakes will charm everyone with their glossy green buttercream and sparkling decorations.
Jump to:
Why You'll Make This on Repeat
This Christmas Tree Cupcakes Recipe hits all the right notes when it comes to flavor, texture, and visual appeal. You'll love how these cupcakes come together with simple pantry ingredients, yet end up looking like something special from a bakery's holiday window.
- Reliable Texture: Each cupcake bakes up moist and tender with a delicate crumb that's neither too dense nor too airy.
- Balanced, Cozy Flavor: The subtle cocoa notes blended with vanilla frosting create a comforting yet festive taste.
- Pantry-Friendly: You likely have most ingredients on hand already, making this an easy last-minute festive treat.
- Weeknight Simple: The steps are straightforward, so you can whip these up even on a busy evening before your celebration.
Ingredient Highlights

For this Christmas Tree Cupcakes Recipe, ingredient quality truly shows in the final result. Using fresh, unsalted butter and good-quality cocoa will ensure your cupcakes are rich and flavorful. Don't rush on your eggs and sugar - thoroughly creaming them makes a big difference!
- Baking spread or unsalted butter: Choose a fresh, unsalted variety for a clean, creamy base that whips nicely.
- Caster sugar: Its fine texture helps create a light crumb and enhances fluffiness.
- Self-raising flour: This saves you measuring baking powder separately and helps your cupcakes raise perfectly.
- Cocoa powder: Use unsweetened cocoa for a deep chocolate taste without added bitterness.
- Buttercream ingredients: Softened butter and sifted icing sugar blend smoothly for that glossy, spreadable finish.
- Green food colouring: Go for gel colour for vibrant hues without watering down your buttercream.
Quick Note: Exact measurements and baking times can be found at the end of this article in the printable recipe card.
Step-by-Step for Christmas Tree Cupcakes Recipe
Step 1 - Prep & Season
Start by preheating your oven to 140°C fan (160°C conventional). Line a 12-hole cupcake tin with cases - I like using sturdy paper liners to help keep the cupcake shapes neat. Next, cream the softened baking spread (or butter) with caster sugar using an electric mixer on medium speed for about five minutes. You'll notice the mixture become glossy and pale, which is a good sign that air is incorporated for a fluffy crumb. Add the eggs one at a time with a splash of milk, beating well after each addition to prevent curdling. This builds a smooth batter base for your cupcakes.
Step 2 - Build Flavor
Now, sift together self-raising flour, cocoa powder, and baking powder directly into your wet ingredients. Gently fold these dry ingredients using a spatula or whisk, so the batter stays airy and the cocoa distributes evenly. Avoid overmixing here-stop once there are no visible streaks of flour. When you divide the batter between your cupcake cases, filling each about two-thirds full, they'll bake evenly without spilling over. As they bake for 25-30 minutes, your kitchen will be filled with that warm, toasty chocolate scent - it's such a cozy reminder that Christmas is near.
Step 3 - Finish for Best Texture
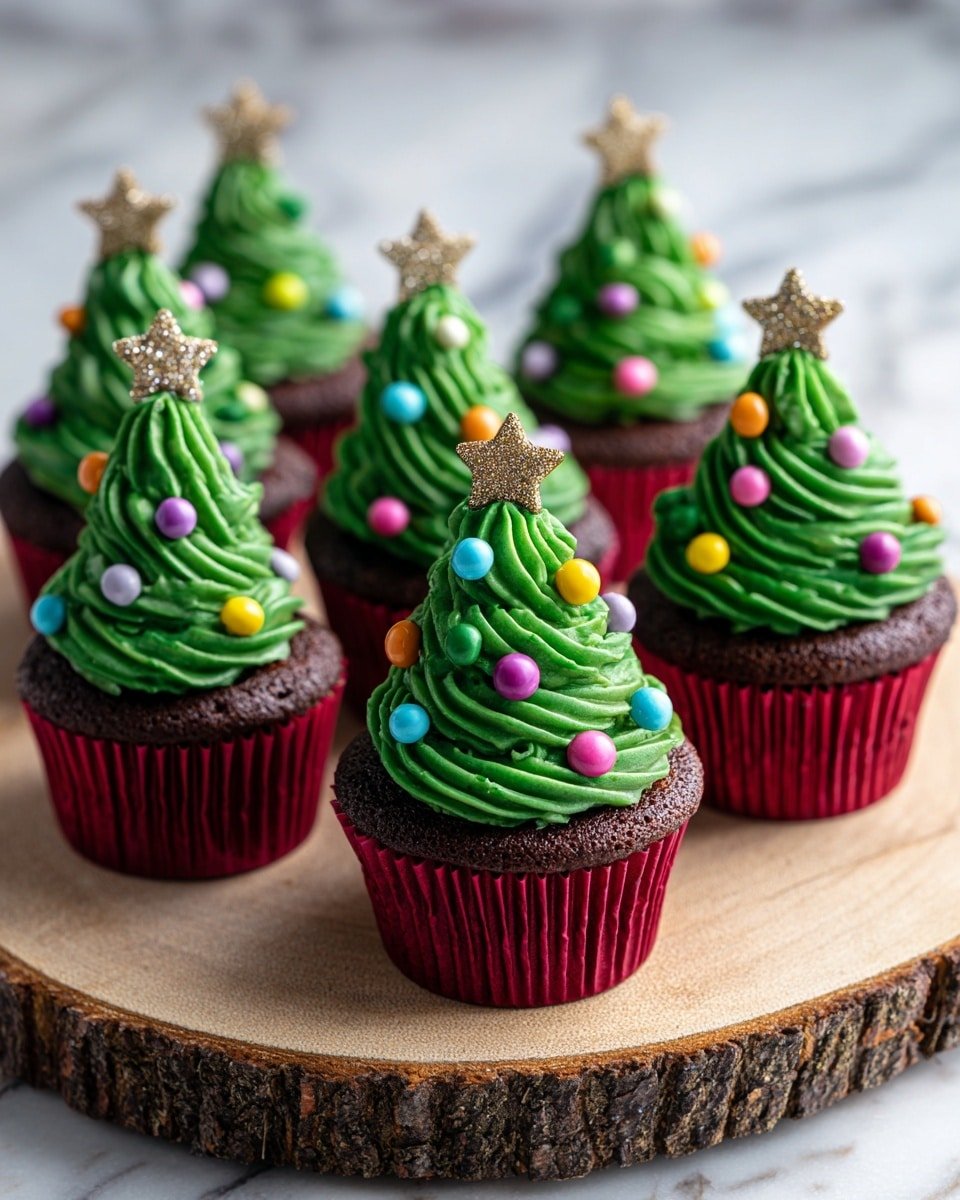
Once baked, test your cupcakes by inserting a thin skewer; it should come out clean with just a few moist crumbs. Cool them completely on a wire rack, as adding buttercream too soon can lead to a melted mess. While they cool, you can paint your chocolate stars with gold lustre dust mixed with a bit of dipping solution or vodka - I like how these glimmer like little ornaments on the finished cupcakes. When ready, whip your buttercream until smooth and fluffy, tinting it with green food coloring to mimic fresh pine needles. Pipe or spread the buttercream generously, then decorate with the chocolate stars and small coloured chocolate beans for an extra festive sparkle.
Kitchen Notes I Rely On
From my experience, small details like properly creaming the butter and sugar or folding the flour gently make all the difference in the texture of these Christmas Tree Cupcakes Recipe. Timing is key during baking and cooling to get that picture-perfect finish.
- Doneness Cue: A clean skewer with moist crumbs, not wet batter, signals they're done.
- Temperature Trick: Using a fan-assisted oven at the recommended setting gives even heat, preventing soggy bottoms.
- Make-Ahead Move: You can bake the cupcakes a day ahead, store airtight, and frost just before serving to keep flavors fresh.
- Skip This Pitfall: Don't frost warm cupcakes-the buttercream will melt and slide right off.
Serving & Sides

Finishing Touches
This Christmas Tree Cupcakes Recipe finishes best with a fine dusting of icing sugar to mimic fresh snow atop your decorated crowns. The chocolate stars coated in shimmering gold dust elevate the dessert with a festive touch that's both eye-catching and delicious. The small colorful chocolate beans add texture and playful pops of color like ornaments, making each bite interesting and tasty.
Pairs Nicely With
Serve these cupcakes with classic cranberry-orange punch or a rich cup of spiced hot chocolate. The fruity acidity and warmth complement the buttery, chocolatey cupcakes perfectly. For a contrast in texture, a side of crisp gingerbread cookies or toasted nuts works beautifully to round out your festive spread.
Simple Plating Upgrades
Arrange cupcakes on a festive platter lined with pine sprigs or holly for a seasonal vibe. Sprinkle a little extra edible glitter to catch the light. For a casual get-together, place them in cupcake wrappers decorated with ribbons or little tags that say "Merry Christmas" to personalize the presentation quickly.
Make-Ahead & Storage
Storing Leftovers
Store leftover cupcakes in an airtight container in a cool place, ideally your fridge, for up to three days. The buttercream holds up well when chilled, but bring the cupcakes back to room temperature briefly before serving to refresh that soft crumb and creamy frosting texture.
Freezer Tips
This Christmas Tree Cupcakes Recipe freezes well if you want to prepare in advance. Freeze the unfrosted cupcakes in a sealed container, then thaw at room temperature before piping the buttercream. You can also freeze frosted cupcakes wrapped individually, but for the very best texture and appearance, I prefer to decorate once thawed.
Reheating Christmas Tree Cupcakes Recipe Without Drying Out
If you want to warm up the cupcakes slightly, pop them in the oven at 150°C (300°F) for 5-7 minutes, avoiding the frosting area if possible. Using a microwave is faster-zap each cupcake for about 10-15 seconds on medium power and watch closely so you don't dry the crumb. Air fryers can work well too; just use a low setting and keep an eye on them. You'll want to maintain moisture, so avoid overheating.
Frequently Asked Questions
Yes, you can substitute with plain flour by adding 2 teaspoons of baking powder to the dry ingredients to mimic self-raising flour's leavening effects.
Use gel-based food coloring instead of liquid, as it provides intense color without thinning the frosting.
Absolutely! Make it a day ahead, store it covered in the fridge, and bring it to room temperature before re-whipping to restore its fluffy texture.
You can substitute with edible silver dust, colored sugar crystals, or simply leave the chocolate stars plain-they'll still look festive.
Final Thoughts
This Christmas Tree Cupcakes Recipe is one I return to every holiday because it combines charming looks with dependable flavor and texture. I hope you find baking these as joyful as I do-there's something extra special about creating treats that catch the eye and bring smiles. Remember, a little patience during prep and cooling goes a long way toward perfectly festive cupcakes. Enjoy decorating and sharing these little trees of sweetness with your loved ones this season!
PrintPrintable Recipe
Christmas Tree Cupcakes Recipe

Delight in these festive Christmas Tree Cupcakes featuring rich cocoa sponge topped with vibrant green buttercream and shimmering edible decorations, perfect for holiday celebrations.
- Prep Time: 25 minutes
- Cook Time: 30 minutes
- Total Time: 55 minutes
- Yield: 12 servings
- Category: Dessert
- Method: Baking
- Cuisine: British
- Diet: Vegetarian
Ingredients
For the cupcakes
- 175 g Baking spread or unsalted butter, softened
- 175 g Caster sugar
- 3 large Eggs
- 2 tablespoon Milk
- 150 g Self raising flour
- 25 g Cocoa powder
- ¼ teaspoon Baking powder
For the buttercream
- 200 g Unsalted butter, softened
- 400 g Icing sugar
- 1 teaspoon Vanilla extract
- 2-3 tablespoon Milk
- Green food colouring
For decoration
- 12 Chocolate stars (Dr Oetker preferred)
- 0.5 g Gold sparkle lustre dust
- Dipping solution or vodka
- 35 g Small coloured chocolate beans
- 1 teaspoon Icing sugar for dusting
Instructions
- Preheat oven and prepare tin: Preheat your oven to 140C Fan/160C/325F/Gas Mark 3, and line a cupcake tin with cupcake cases to prevent sticking.
- Make cupcake batter: Cream together the baking spread and caster sugar using an electric mixer for 5 minutes until the mixture is smooth and fluffy.
- Add eggs and milk: Whisk in the eggs and milk thoroughly to combine all wet ingredients evenly.
- Incorporate dry ingredients: Gently fold in the self raising flour, cocoa powder, and baking powder to maintain airiness without overmixing.
- Fill and bake: Divide the batter evenly among the cupcake cases and bake for 30 minutes or until a thin skewer inserted into the center comes out clean. Cool cupcakes on a rack completely.
- Decorate chocolate stars: Place the chocolate stars on baking paper. Mix the lustre dust with dipping solution or vodka to create edible gold paint. Use a food-safe brush to paint the stars, applying a second coat if needed. Let dry fully.
- Prepare buttercream: Beat the softened butter alone for a few minutes until creamy. Add icing sugar, vanilla extract, milk, and green food colouring, mixing until smooth and pipeable. Adjust milk amount if buttercream is too stiff.
- Assemble cupcakes: Spread or pipe the green buttercream on top of each cooled cupcake. Decorate with the gold-painted chocolate stars, mini coloured chocolate beans, and dust lightly with icing sugar.
- Storage: Store cupcakes in an airtight container in a cool place and consume within 3 days for best freshness.
Notes
- Use an electric mixer for fluffy cupcake batter and smooth buttercream.
- Folding the flour gently prevents deflating the batter.
- Allow cupcakes to cool completely before decorating to avoid melting the buttercream.
- Use vodka or a clear dipping solution to mix with lustre dust for edible paint.
- Add more milk to buttercream to adjust consistency for piping or spreading.
- Store in a cool place, not refrigerated, to maintain buttercream texture.


Leave a Reply