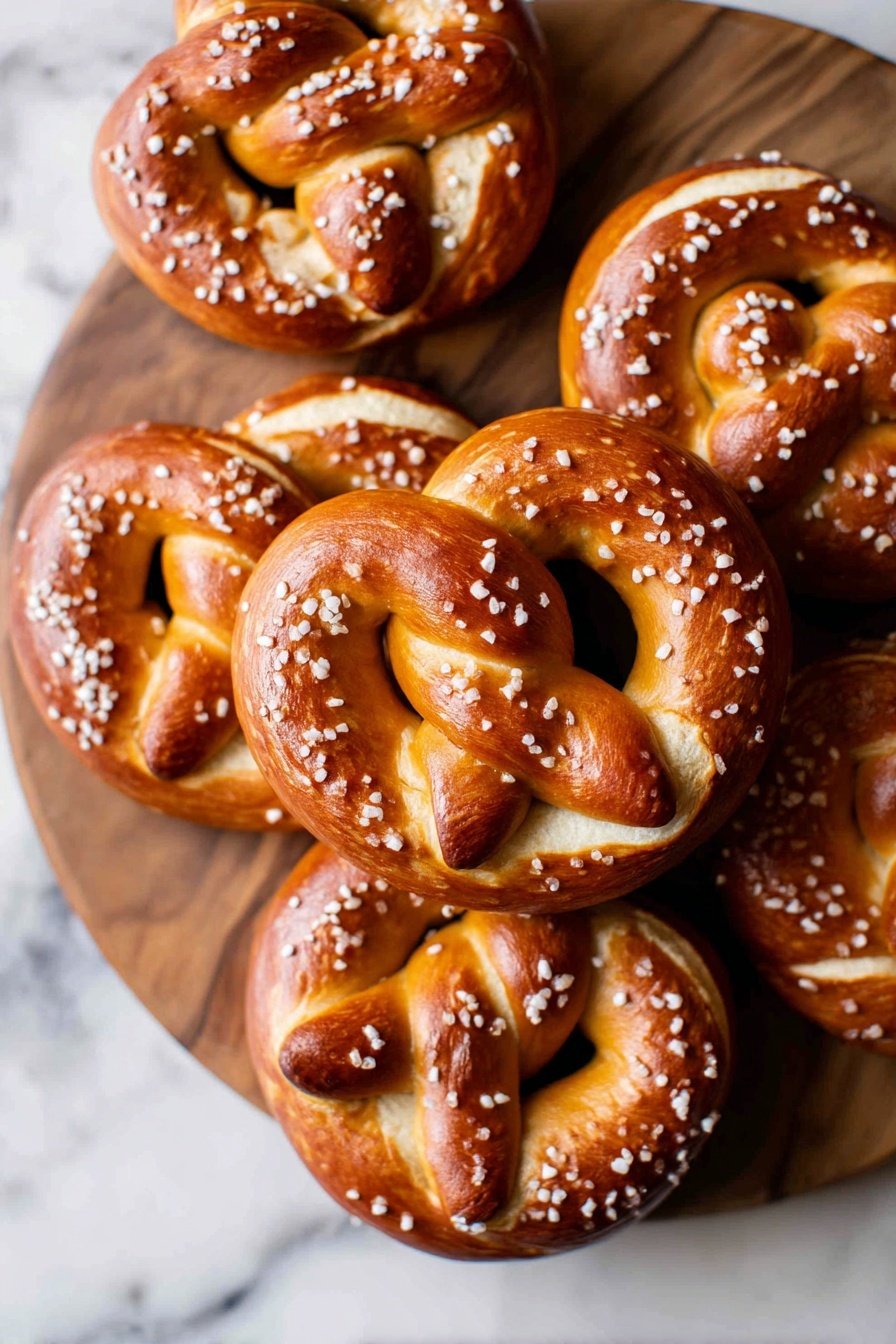
When you want a snack that's warm, comforting, and irresistibly chewy, this Chewy Salted Soft Pretzels Recipe fits the bill. Whether you're craving a cozy afternoon treat, preparing for a game day party, or just fancy baking something fun, these soft pretzels come together with simple ingredients and deliver big on flavor and texture every time.
Jump to:
Why You'll Make This on Repeat
I love how this recipe balances the iconic chewy bite of a soft pretzel with just the right hit of saltiness on top. Once you try it, you'll realize it's not just about the taste-it's the whole experience of making them from scratch, boiling, shaping, and baking that feels so satisfying.
- Reliable Texture: The dough yields the perfect chew, never too dense or too fluffy.
- Balanced, Cozy Flavor: A touch of brown sugar in both dough and water bath adds depth without sweetness overload.
- Pantry-Friendly: You'll find all the ingredients at home or the local store with ease.
- Weeknight Simple: The method is straightforward, even if you're new to pretzels.
Ingredient Highlights
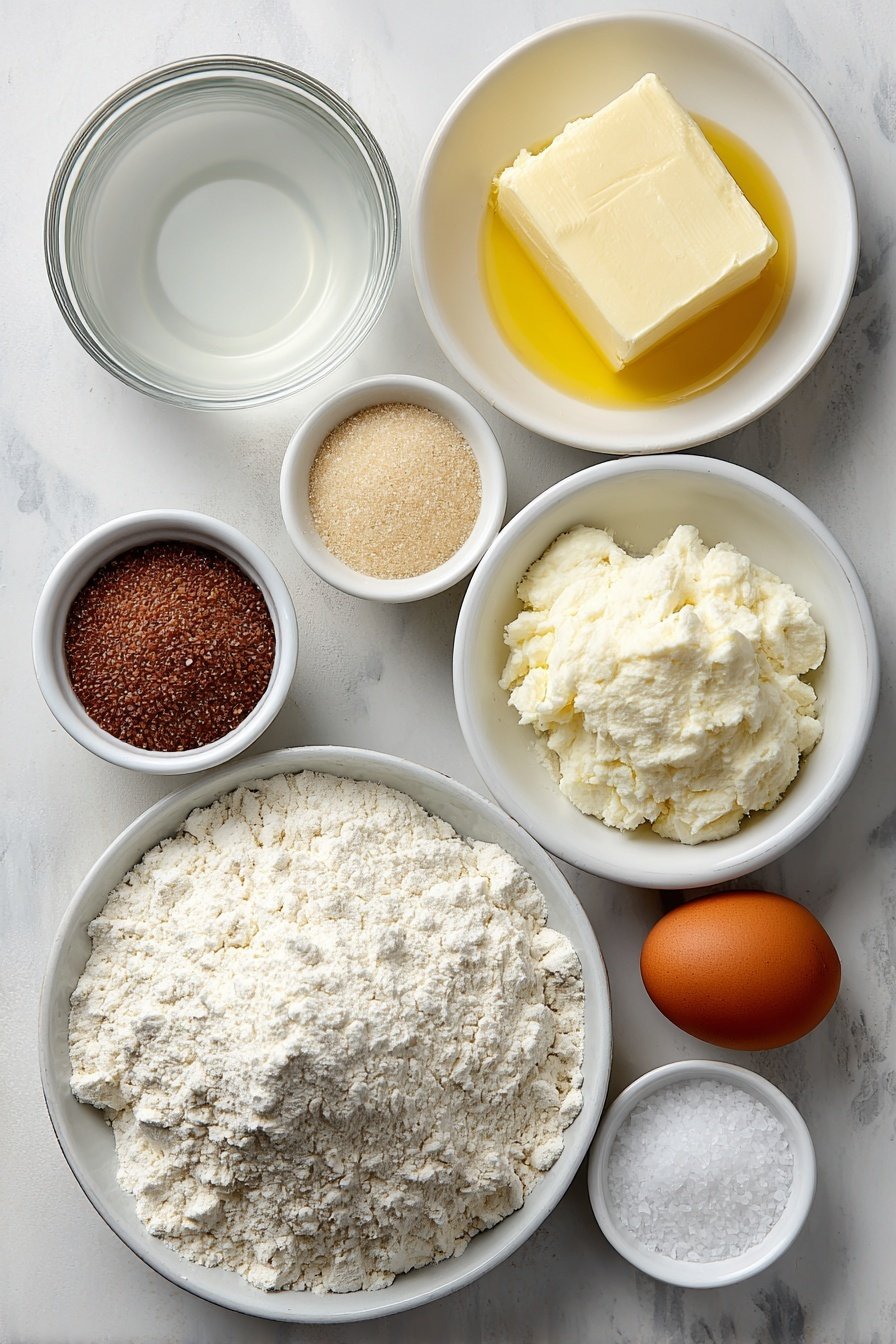
Choosing the right ingredients can really elevate your Chewy Salted Soft Pretzels Recipe. I always suggest using fresh yeast and good-quality all-purpose flour to get that smooth elasticity. Each element plays a part in the final bite-so let's break down what matters most.
- Active Dry Yeast: Check the expiry date for reliable rise; freshness makes that fluffy, chewy crumb.
- Brown Sugar: Adds a gentle caramel hint both in dough and water bath for richer flavor and color.
- Salt Flakes: Use coarse flakes, not fine salt, for that satisfying crunch and burst of saltiness on top.
- Butter: Melted butter adds richness and softness without heaviness-essential for tender bites.
Quick Note: Exact measurements and full recipe instructions are at the bottom for easy reference and printing.
Step-by-Step for Chewy Salted Soft Pretzels Recipe
Step 1 - Prep & Season
Start by activating the yeast in warm water mixed with salt and brown sugar. You'll want to see the mixture become foamy after about 5 minutes-that's your signal the yeast is alive and ready. Stir gently to dissolve but avoid shaking the mixture aggressively. This step feels a bit like waiting for magic to happen, but once the foam appears, you're set.
Step 2 - Build Flavor
Once your yeast is bubbling, add flour and melted butter to the bowl. I like to use a silicone spatula to initially bring the dough together; it's easier to scrape the sides and fold in any stray flour. Then, knead the dough on a clean surface for about 5 to 7 minutes until it feels smooth and elastic-this develops that classic chewy texture you want in your pretzels. After kneading, cover and let it rise till doubled, close to an hour, which gives that airy softness.
Step 3 - Finish for Best Texture
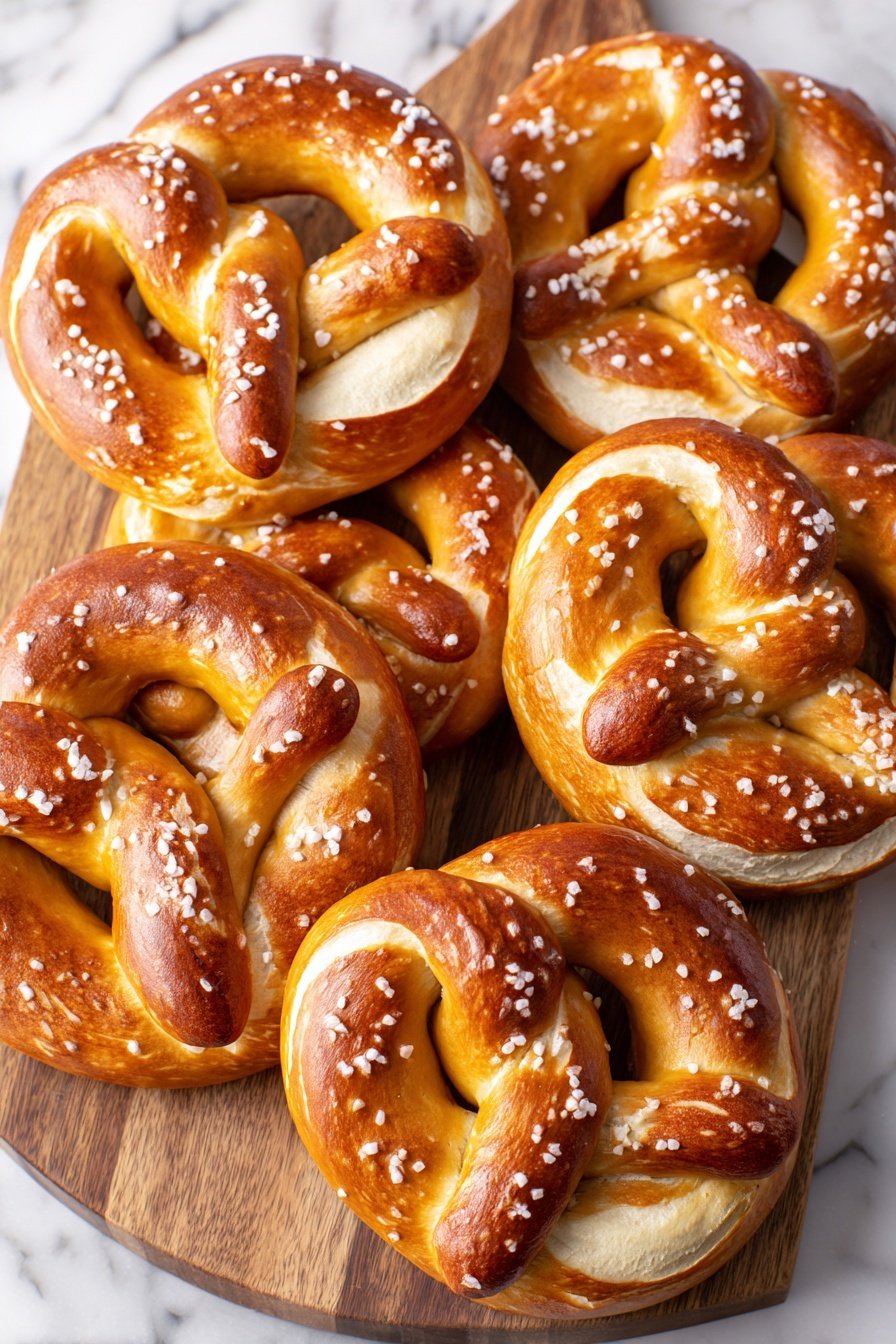
Time to shape the pretzels! Divide the dough into 12 portions and roll each into a long rope. Twisting into the familiar pretzel shape is easier than it looks once you get the hang of it-just make sure to press the ends firmly so they hold together. Next, boil your pretzels in the baking soda, brown sugar water bath. Boiling one minute per side is key for that signature jaw-friendly chew and golden crust-the longer boil really transforms the texture. Finally, egg wash and sprinkle salt flakes before baking. You'll watch them turn that glossy golden brown in the oven after 15 minutes, and the smell alone will pull everyone into the kitchen.
Kitchen Notes I Rely On
Making soft pretzels at home is incredibly rewarding, and a few little habits help me every time. Watching the yeast foam is my go/no-go checkpoint. When boiling, I never overcrowd the pot to ensure every pretzel has enough room to puff properly. If you want a chewier pretzel, give the boiling a full minute on each side-and don't skip the brown sugar; it's a subtle but noticeable difference.
- Doneness Cue: Golden brown and glossy crust, not too dark or pale.
- Temperature Trick: Use 400°F (204°C) for reliable crisp crust without drying out the inside.
- Make-Ahead Move: You can freeze boiled pretzels before baking to save time later.
- Skip This Pitfall: Don't skip the water bath-the baking soda is what creates that iconic pretzel flavor and chewiness.
Serving & Sides
Finishing Touches
I usually recommend a simple brush of melted butter right after baking to add a bit of shine and flavor, but if you want to keep it classic, the egg wash and salt flakes do just fine. Those big salt flakes offer that punch of saltiness against the soft dough, and the contrast is irresistible.
Pairs Nicely With
Soft pretzels were made for dipping. Mustard, especially spicy or honey mustard, is a wonderful complement. Cheese dips, like a creamy beer cheese or a sharp cheddar sauce, are show-stoppers. I also love serving them alongside a fresh salad for balance or even alongside some sliced cured meats when I'm putting out a casual snack board.
Simple Plating Upgrades
For a special occasion, sprinkle some everything bagel seasoning instead of plain salt, or drizzle a little melted garlic butter on top. Stack pretzels in a basket lined with parchment for a relaxed vibe, and add small bowls of dips scattered around. You'll get that inviting, bakery-style display with minimal fuss.
Make-Ahead & Storage
Storing Leftovers
Store leftover pretzels in an airtight container or zip-top bag at room temperature for up to two days. They'll maintain a soft, chewy texture but aren't quite the same as freshly baked. If you notice they get a little firm, brief reheating is your friend.
Freezer Tips
This Chewy Salted Soft Pretzels Recipe freezes beautifully, especially if you freeze them after boiling and before baking. Wrap each pretzel tightly in plastic wrap and place them in an airtight freezer bag. They keep well for up to 2 months. When ready, bake from frozen adding a few extra minutes to the baking time.
Reheating Chewy Salted Soft Pretzels Recipe Without Drying Out
To refresh your pretzels, wrap them loosely in foil and warm them in a 350°F oven for about 10 minutes. For a quicker route, a 15-second microwave zap wrapped in a damp paper towel works but can lose some crispness. An air fryer at 320°F for 3 to 4 minutes also revives crispness nicely without drying the interior.
Frequently Asked Questions
Yes, instant yeast can be used with no need to proof it first; just mix directly with flour and adjust resting times as needed.
The alkaline baking soda bath gives pretzels their signature chewy crust and deep golden color by altering the dough's pH during boiling.
You can omit brown sugar, but it helps with browning and adds a subtle flavor layer, so I recommend including it for best results.
Aim for about 20 inches long and roughly half an inch thick; this balances easy shaping and perfect baking.
Final Thoughts
Making these soft pretzels from scratch is such a satisfying project-especially when you pull that first warm pretzel from the oven and hear the crisp crust give way to a chewy inside. The Chewy Salted Soft Pretzels Recipe isn't just about the end result; it's about enjoying the process, the smells, and the smiles that come with sharing warm, homemade treats. Trust me, once you try this, it becomes a weekend ritual you'll look forward to repeating.
PrintPrintable Recipe
Chewy Salted Soft Pretzels Recipe

These salted soft pretzels are a classic homemade treat with a chewy crust and a soft, fluffy interior. Boiled briefly in a baking soda bath to achieve their signature texture, then baked to golden perfection and sprinkled with coarse salt flakes, they make a perfect snack or appetizer.
- Prep Time: 15 minutes
- Cook Time: 15 minutes
- Total Time: 1 hour 30 minutes
- Yield: 12 pretzels
- Category: Snack
- Method: Baking
- Cuisine: American
Ingredients
For the Pretzels:
- 4 grams active dry yeast
- 300 grams water (300 ml)
- 6 grams salt (1 teaspoon)
- 20 grams brown sugar (1 tablespoon)
- 450 grams all-purpose white flour
- 15 grams butter, melted (1 tablespoon)
- 1 egg, beaten (for egg wash)
- ¼ cup salt flakes (for sprinkling)
For the Water Bath:
- 10 cups water
- ½ cup baking soda
- ¼ cup brown sugar
Instructions
- Prepare the Dough: Combine yeast, water, salt, and sugar in a large mixing bowl and stir to dissolve. Let the yeast mixture rest for 5 minutes until it becomes foamy, indicating the yeast is active and ready to use.
- Mix and Knead: Add the flour and melted butter to the yeast mixture. Stir with a silicone spatula until the dough forms a shaggy mass and no dry flour remains. Scrape down the bowl sides as needed. Transfer the dough to a clean surface and knead it for 5 to 7 minutes until smooth. Return the dough to the bowl, cover with cling wrap, lightly brush with oil to prevent drying, and let it rest at room temperature for up to 1 hour or until doubled in size.
- Shape the Pretzels: Preheat the oven to 400°F (204°C). Divide the dough into 12 equal pieces using a bench scraper. Roll each piece into a 20-inch rope. Form each rope into a circle, twist the ends twice, and press them down to create the classic pretzel shape. Cover shaped pretzels with cling wrap while preparing the water bath.
- Prepare the Water Bath and Boil Pretzels: In a large pot, bring 10 cups water, ½ cup baking soda, and ¼ cup brown sugar to a boil. Boil 3-4 pretzels at a time, ensuring space for floating, for 30 seconds to 1 minute on each side-the longer boiling time results in chewier, browner pretzels after baking. Remove and place pretzels onto parchment-lined baking sheets and let dry for 5 minutes.
- Apply Egg Wash and Salt: Brush the pretzels evenly with beaten egg to promote browning and help the salt flakes adhere. Generously sprinkle the salt flakes over the pretzels.
- Bake the Pretzels: Bake in the preheated 400°F oven for 15 minutes or until the pretzels turn golden brown. Remove from oven and transfer to a wire rack to cool completely before serving.
Notes
- For a chewier pretzel, boil in the water bath closer to 1 minute per side.
- Use coarse or flaked salt for the best texture and flavor on top of the pretzels.
- Reheat pretzels slightly before serving if they have cooled down; they taste best warm.
- You can substitute butter with oil to make it dairy-free, but butter adds richer flavor.
- Make sure your yeast is fresh and active for the dough to rise properly.


Leave a Reply