If you're looking for a dessert that's both bite-sized and indulgently comforting, this Cherry Chocolate Cheesecake Bites Recipe is the perfect pick. These mini cheesecakes offer a glossy chocolate swirl and a burst of fresh cherry sweetness, making them ideal for parties, weeknight treats, or whenever you want a touch of something special at the table.

Jump to:
Why You'll Make This on Repeat
There's something truly satisfying about a treat that balances rich chocolate and tangy cherries in a convenient, no-fuss bite. This recipe delivers a consistently smooth cheesecake texture wrapped in a buttery graham crust, topped with bright, juicy cherries that bring a fresh pop of flavor.
- Reliable Texture: The cream cheese blends beautifully with melted chocolate for a luscious but firm filling that won't crack or crumble.
- Balanced, Cozy Flavor: Sweet chocolate, tart cherries, and a slightly toasted crust come together in perfect harmony.
- Pantry-Friendly: You likely have most ingredients on hand, making this an easy go-to for an impromptu dessert.
- Weeknight Simple: Minimal prep and fewer steps mean you can pull these off even after a busy day.
Ingredient Highlights

For the best Cherry Chocolate Cheesecake Bites Recipe, I always recommend using high-quality ingredients where it counts. Fresh cherries are key to giving this dessert its bright finish, while smooth cream cheese creates that perfect creamy base.
- Graham cracker crumbs: Use finely crushed crumbs for a compact, even crust that holds together well.
- Unsalted butter: Melted helps bind the crust and lets you control the salad seasonings.
- Cream cheese: Make sure it's softened to room temperature so the filling blends smoothly without lumps.
- Semi-sweet chocolate chips: Melted for rich pockets of chocolate flavor without becoming overly sweet.
- Fresh cherries: Pitted and juicy; frozen can work in a pinch, but fresh really elevates the bites.

Quick Note: Exact measurements are in the printable recipe card at the bottom.
Step-by-Step for Cherry Chocolate Cheesecake Bites Recipe
Step 1 - Prep & Season
Start by preheating your oven to 350°F (175°C). Combine the graham cracker crumbs with the melted unsalted butter until the mixture looks evenly moistened and glossy. Press this mixture firmly into muffin tins lined with cupcake liners to form the crust. You'll notice the texture becomes compact and slightly shiny, which is your cue for an even bake. Bake for 8 to 10 minutes until you see the edges turning lightly golden, then let them cool completely before adding the filling. This step sets a sturdy base without sogginess, so don't skip the cooling.
Step 2 - Build Flavor
Next, beat the softened cream cheese with granulated sugar until the mixture becomes perfectly smooth and creamy - no lumps here! This is what makes each bite melt-in-your-mouth. Carefully fold in your melted semi-sweet chocolate chips, ensuring the batter blends a glossy, uniform color. Don't rush this step; gently folding keeps it light and luscious. Fill each cooled crust generously with this chocolate cheesecake batter, watching for a shiny, silky top surface before baking.
Step 3 - Finish for Best Texture
Bake the filled muffin tins again for 15 to 20 minutes. You want the cheesecake bites to be set around the edges while still having a slight jiggle in the center - this ensures they stay creamy instead of drying out. After baking, let them cool on the counter until no longer warm, then chill in the refrigerator for at least two hours. This rest time is crucial; it firms them up to the perfect bite-size consistency and deepens the chocolate cherry flavor combo.
Kitchen Notes I Rely On
I've learned that keeping the cream cheese softened-not cold or melted-is essential for smoothness. Also, be patient baking to just the right doneness; overbaking leads to cracks and dryness, which is heartbreaking in this delicate dessert.
- Doneness Cue: Edges should feel firm, center slightly wobbly to the touch.
- Temperature Trick: Use room-temp ingredients for silky batter consistency.
- Make-Ahead Move: Chill bites overnight to intensify flavor and ease serving.
- Skip This Pitfall: Don't overfill crusts; it makes the bites messy and harder to handle.
Serving & Sides

Finishing Touches
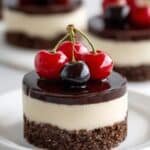
Before serving, I like to arrange a fresh cherry on top of each cheesecake bite to enhance that juicy-tart contrast and add a fresh pop of color. A light dusting of powdered sugar or a drizzle of chocolate ganache can also elevate these bites into a delightful finish for any meal or celebration.
Pairs Nicely With
These cheesecake bites pair exceptionally well with a dollop of whipped cream or a scoop of vanilla bean ice cream. For drinks, a cup of rich coffee or a glass of cold milk complements the chocolate and cherry flavors beautifully, balancing richness with refreshment.
Simple Plating Upgrades
For a quick styling hack, try serving these bites on a slate board with scattered fresh cherries and a few mint leaves. This adds a beautiful contrast and feels effortlessly elegant, perfect for impressing guests without extra fuss.
Make-Ahead & Storage
Storing Leftovers
Keep leftover Cherry Chocolate Cheesecake Bites in an airtight container in the refrigerator for up to 4 days. They maintain their creamy texture well chilled, but you'll find them best enjoyed within two days for the freshest taste and texture.
Freezer Tips
These cheesecake bites freeze nicely when wrapped individually in plastic wrap and placed in a sealed container for up to one month. Thaw them overnight in the fridge to preserve their creamy, smooth texture without separation or watery spots.
Reheating Cherry Chocolate Cheesecake Bites Recipe Without Drying Out
To warm up leftovers without drying out, gently heat in a microwave on low power for 10 to 15 seconds-just enough to soften slightly but not melt. Alternatively, an air fryer at 300°F for 3 minutes can refresh them nicely. Avoid high heat or long reheats to keep them luscious.
Frequently Asked Questions
Yes, frozen cherries can work if fresh aren't available, but be sure to thaw and drain them well to avoid excess moisture that could affect the cheesecake texture.
Cut the cream cheese into small cubes and let it sit at room temperature for about 30 minutes. Alternatively, you can microwave it in short 10-second intervals, checking frequently to prevent melting.
Absolutely! Substitute dairy cream cheese with a plant-based alternative and use dairy-free chocolate chips and vegan butter for the crust-results will be delicious and allergy-friendly.
Avoid overbaking and high oven temperatures. Bake until slightly jiggly in the center and let them cool gradually. Using room temperature ingredients also helps prevent cracks.
Final Thoughts
Making these Cherry Chocolate Cheesecake Bites feels like a win every time-it's a straightforward recipe that delivers bright flavors and a luscious texture in a perfectly portable size. Whether you're baking for a crowd or a solo treat, these bites bring warmth and a little indulgence to your day. Don't hesitate to tweak the cherry topping or chocolate based on your cravings. I love how simple ingredients can create something so lovingly memorable, and I hope you enjoy making (and eating) this recipe as much as I do.
PrintPrintable Recipe
Cherry Chocolate Cheesecake Bites Recipe
Indulge in these delightful Mini Cherry Chocolate Cheesecakes, featuring a buttery graham cracker crust, a smooth chocolate-infused cream cheese filling, and topped with fresh, juicy cherries. Perfect for individual servings, these cheesecakes combine rich chocolate and tart cherry flavors in a bite-sized treat.
- Prep Time: 20 minutes
- Cook Time: 30 minutes
- Total Time: 50 minutes
- Yield: 12 mini cheesecakes
- Category: Dessert
- Method: Baking
- Cuisine: American
Ingredients
Crust
- 1 cup graham cracker crumbs
- 5 tablespoons unsalted butter (melted)
Filling
- 8 oz cream cheese (softened)
- ⅓ cup granulated sugar
- ½ cup semi-sweet chocolate chips (melted)
Topping
- 1 cup fresh cherries (pitted)
Instructions
- Preheat oven: Preheat your oven to 350°F (175°C) to prepare for baking your mini cheesecakes.
- Prepare crust: In a bowl, combine the graham cracker crumbs with melted unsalted butter until the mixture resembles wet sand. Press this mixture firmly into the bottom of muffin tins lined with cupcake liners to form the crust bases.
- Bake crusts: Bake the crust-filled muffin tins for 8-10 minutes or until the edges are slightly golden. Remove from oven and allow to cool completely.
- Make filling: In a mixing bowl, beat the softened cream cheese and granulated sugar until the mixture is smooth and creamy. Gently fold in the melted semi-sweet chocolate chips until well combined.
- Fill crusts: Spoon the chocolate cream cheese mixture over the cooled crusts, filling each muffin cup evenly.
- Bake cheesecakes: Return the filled muffin tins to the oven and bake for 15-20 minutes. The cheesecakes should be set around the edges but slightly jiggly in the center when done.
- Cool and chill: Allow the mini cheesecakes to cool at room temperature, then refrigerate them for at least two hours to fully set and enhance flavors.
- Top and serve: Just before serving, top each cheesecake with fresh pitted cherries for a bright, juicy finish.
Notes
- Use room temperature cream cheese for a smoother filling consistency.
- You can substitute fresh cherries with frozen, but be sure to thaw and drain them well.
- To melt chocolate chips, use a double boiler or microwave in short bursts, stirring often to avoid burning.
- For easy removal, gently pull the cupcake liners away from the cheesecakes before serving.
- Store leftover mini cheesecakes covered in the refrigerator for up to 3 days.


Leave a Reply