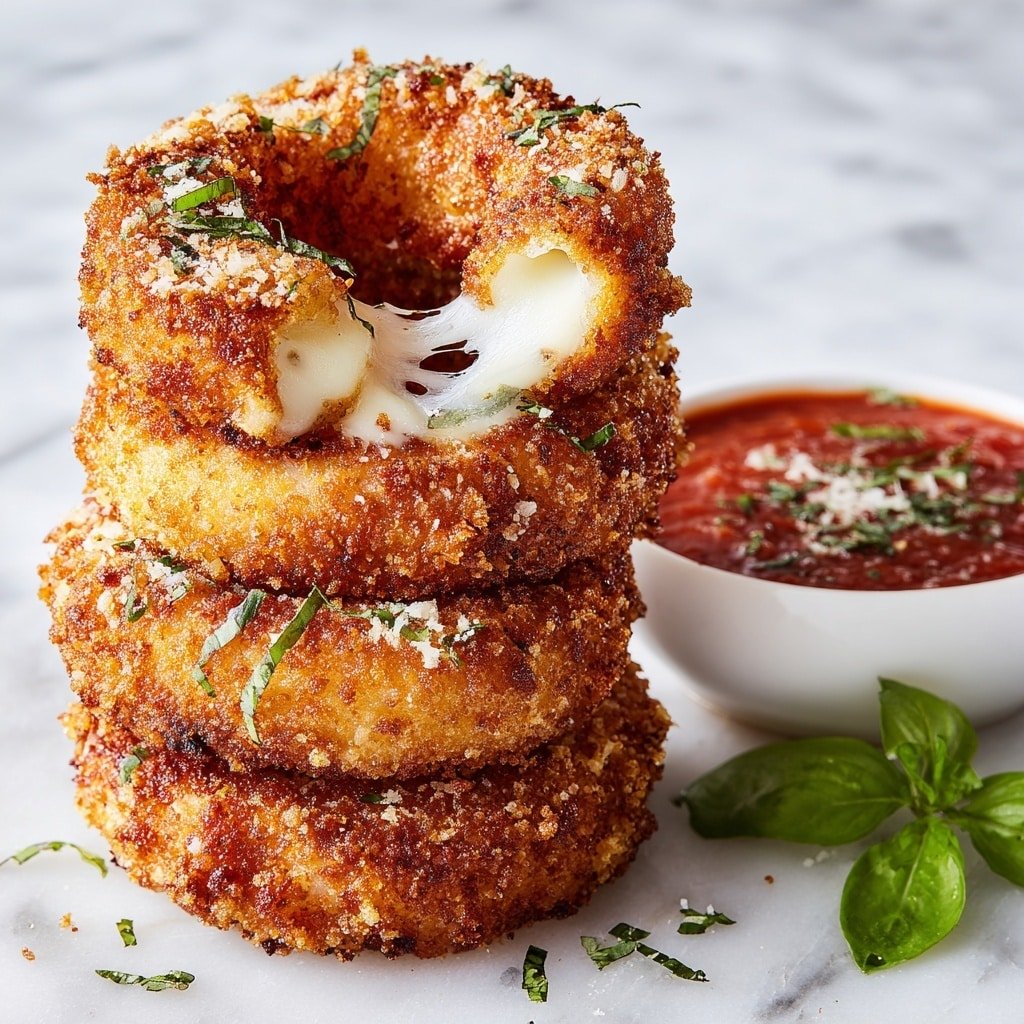
When you want to elevate classic onion rings into something deliciously indulgent, this Cheesy Mozzarella Onion Rings Recipe is exactly what you need. Perfect for weekend snacks, game day, or anytime you crave a crispy, cheesy treat, these onion rings bring a satisfying twist with gooey mozzarella tucked inside. You'll notice how the cheese melts into each bite, creating a cozy comfort food experience that's hard to resist.
Jump to:
Why You'll Make This on Repeat
Because it pairs familiar onion rings with an irresistible cheesy core, this recipe turns a simple snack into something memorable. You'll find it's a hit every time and surprisingly easy to prepare once you get the hang of the layering and coating steps.
- Reliable Texture: The double coating of flour, egg, and breadcrumbs ensures a perfectly crispy crust that holds together well during frying.
- Balanced, Cozy Flavor: Mozzarella cheese melts perfectly inside the sweet onion rings-a mild, creamy balance that's never overpowering.
- Pantry-Friendly: You only need basic staples plus mozzarella and onions, making this a go-to for when you want comfort food without a big grocery run.
- Weeknight Simple: You can prepare these in stages and freeze for later, which makes dinnertime a breeze on busy days.
Ingredient Highlights

Choosing the right ingredients can really elevate your Cheesy Mozzarella Onion Rings Recipe. I like to find the freshest white onions and use whole mozzarella slices or sticks for a luscious melt. The coating also benefits from using fresh breadcrumbs and eggs at room temperature.
- White Onions: Select large, firm onions with tight layers to get perfect rings that can hold the cheese snugly.
- Mozzarella Cheese: Opt for fresh mozzarella or good-quality mozzarella sticks sliced evenly so the cheese melts evenly inside.
- All-purpose Flour: This helps the coating stick to the onion and cheese layers for a crisp finish.
- Plain Breadcrumbs: Use fresh or homemade breadcrumbs for an authentically crunchy crust.
- Eggs: Beat until smooth; they act as the glue binding the coating.
- Vegetable Oil: Use a neutral oil with a high smoke point, like canola or sunflower, for deep frying.

Quick Note: Exact measurements are in the printable recipe card at the bottom.
Step-by-Step for Cheesy Mozzarella Onion Rings Recipe
Step 1 - Prep & Season
Start by peeling the onions and slicing them into roughly half-inch-thick rounds. Carefully separate each ring to keep them intact. Then slice the mozzarella into strips that will nestle perfectly inside the onion rings. I find it easiest to place a smaller ring inside a larger one and fill the space between with cheese strips-this creates a delicious "mozzarella sandwich" that melts so nicely. Arrange these stacked rings on a tray and pop them into the freezer for about an hour to firm up. Freezing helps them hold together during the coating and frying process.
Step 2 - Build Flavor
While the onion rings chill, get your dredging station ready with three bowls: one with flour, one with beaten eggs, and one with plain breadcrumbs. The key here is layering the coating well. Remove the rings from the freezer and start by dusting them lightly in flour, then dipping into the egg mixture, and finally coating in breadcrumbs. For an extra crispy finish, give the rings a second dip in egg and breadcrumbs. Trust me, this double coat creates that perfect crunch you want with every bite.
Step 3 - Finish for Best Texture
Heating your oil to around 350°F is crucial for achieving that toasty, golden crust without burning. Fry the onion rings in small batches to avoid overcrowding, cooking each batch for about 2 to 3 minutes. You'll know they're done when the crust is a deep golden brown and you can hear that satisfying sizzle when you lift them out. Watch carefully so the cheese doesn't leak out; frying too long or at too high a temperature can cause that. Drain on paper towels to keep them crisp, then serve piping hot with your favorite marinara sauce for dipping.
Kitchen Notes I Rely On
This recipe demands a bit of patience, but the payoff is worth every crispy, cheesy bite. The freezing steps ensure the rings stay together and the coating crisps perfectly. I always crack an extra egg or two as backup-sometimes a little extra moisture helps the coating adhere better.
- Doneness Cue: When the rings turn a rich golden brown and float to the surface, it's time to take them out.
- Temperature Trick: Use a thermometer to maintain 350°F oil; too hot will burn the coating, too cool will make it greasy.
- Make-Ahead Move: Coat the onion rings, freeze them fully, then fry straight from the freezer for speedy prep.
- Skip This Pitfall: Don't skip the freezing step-it's key to prevent cheese leakage during frying.
Serving & Sides
Finishing Touches
Marinara sauce is my go-to for dipping since its tangy, herbal notes cut through the richness of the mozzarella beautifully. I also like sprinkling a bit of flaky sea salt over the onion rings just after frying-it boosts the flavor and adds a subtle crunch contrast you'll love.
Pairs Nicely With
These cheesy onion rings feel right at home alongside a simple garden salad or crisp coleslaw to balance the richness. You can even serve them with a cold beer or iced tea for a relaxed snack session. I often pair them with soft burgers or grilled chicken sandwiches for a satisfying meal.
Simple Plating Upgrades
On busy nights, piling the rings on a white plate with a ramekin of sauce is foolproof and attractive. For a special occasion, try stacking rings with fresh herbs sprinkled on top and a drizzle of balsamic glaze alongside. Brightly colored serving boards or small bowls of different dips make for a festive spread that invites sharing.
Make-Ahead & Storage
Storing Leftovers
Store leftover cheesy mozzarella onion rings in an airtight container lined with paper towels to absorb moisture. They keep well in the fridge for up to 3 days, though they aren't quite as crisp as freshly fried. Reheating with care preserves texture.
Freezer Tips
This recipe actually freezes beautifully both before and after frying. Freeze the fully coated rings in a single layer on a tray, then transfer to a freezer-safe bag. They'll keep for up to 1 month. To thaw, simply fry or bake without defrosting to maintain crispness.
Reheating Cheesy Mozzarella Onion Rings Recipe Without Drying Out
To reheat, preheat your oven or air fryer to 350°F. Pop the rings in for 5-7 minutes until heated through and crisp. Avoid microwaving if you want them crunchy; it tends to make the coating soggy. If using a microwave, cover loosely and reheat in short intervals, then crisp up quickly in a hot pan or air fryer.
Frequently Asked Questions
Absolutely! While mozzarella is ideal for its meltiness and mild flavor, you can try provolone or Monterey Jack. Just make sure the cheese melts well without releasing too much oil.
Freezing firms up the onion and cheese, so they hold their shape during coating and frying. It prevents the cheese from leaking out and helps the breading stay crispy.
You can bake them at 400°F for about 15-20 minutes, turning halfway through. The texture will be less crispy than frying but still tasty and lighter.
Make sure to follow the dredging steps carefully-flour first, then egg, then breadcrumbs, repeating egg and breadcrumbs for a thicker crust. Also, handle the rings gently and fry in small batches so the coating sets nicely.
Final Thoughts
I love making this Cheesy Mozzarella Onion Rings Recipe whenever I want to impress guests or just indulge myself with comfort food that's a little special. The combination of crispy onion, melty cheese, and the cozy dipping sauce never gets old. With a few simple steps and a little patience, you'll find yourself reaching for this recipe again and again. Trust me, the first crispy bite will have you hooked.
PrintPrintable Recipe
Cheesy Mozzarella Onion Rings Recipe

Mozzarella Stick Onion Rings combine the crispy, golden goodness of classic onion rings with a gooey mozzarella cheese center for a delightful appetizer or snack. These rings are stuffed with mozzarella, coated in a triple-layer breading, and deep-fried to perfection, then served with marinara sauce for a deliciously indulgent treat.
- Prep Time: 25 minutes
- Cook Time: 15 minutes
- Total Time: 40 minutes
- Yield: 12-16 stuffed onion rings
- Category: Appetizer
- Method: Frying
- Cuisine: American
Ingredients
Main Ingredients
- 2 large white onions
- 3 slices mozzarella cheese
Dredging and Coating
- 2 cups all-purpose flour
- 5 large eggs
- 2 ½ cups plain breadcrumbs
For Frying and Serving
- Vegetable oil, for deep frying
- Marinara sauce, for dipping
Instructions
- Prepare Onion Rings: Peel the onions and slice into ½-inch thick rings, carefully separating them to maintain whole rings.
- Stuff with Mozzarella: Slice mozzarella cheese into 4 even strips. Nest a smaller onion ring inside a larger ring and place mozzarella strips in the space between them. Repeat with all onion rings.
- Freeze Rings: Arrange the stuffed onion rings in a single layer on a tray and freeze for 1 hour until firm to ensure the cheese stays inside during frying.
- Set Up Breading Stations: Prepare three bowls: one with flour, one with beaten eggs, and one with breadcrumbs. Remove frozen onion rings from the freezer.
- Bread the Rings: Dredge each stuffed onion ring in flour, dip into egg, then coat thoroughly with breadcrumbs. For an extra crispy crust, repeat the egg and breadcrumb dip. Place coated rings on a tray and freeze until ready to fry.
- Heat Oil: Pour vegetable oil into a deep pot and heat to 350°F (175°C), ensuring enough oil for deep frying.
- Fry Onion Rings: Fry the rings in batches, turning occasionally, until golden brown and crisp, about 2-3 minutes. Be careful not to over-fry to prevent cheese leakage.
- Drain and Serve: Remove fried rings with a slotted spoon and drain on paper towels. Serve hot with marinara sauce for dipping.
Notes
- Freezing the stuffed onion rings before frying is essential to keep the cheese from melting too quickly and oozing out.
- For extra crispiness, double coat the onion rings with egg and breadcrumbs.
- Use plain breadcrumbs for a neutral crust or seasoned breadcrumbs for extra flavor.
- Maintain oil temperature around 350°F for perfect frying-too hot will burn the coating, too cool will make them greasy.
- Serve immediately for best taste and texture.


Leave a Reply