If you're craving a crunchy, chocolatey snack that's guilt-free and satisfying, this Healthy Chocolate Puffed Rice Cereal Recipe is exactly what you need. Perfect for a quick breakfast, afternoon nibble, or an anytime treat, it combines the light crispiness of puffed rice with the rich indulgence of cocoa, all sweetened naturally. I love making this on weekends when I want something both cozy and energizing without the sugar crash.

Jump to:
Why You'll Make This on Repeat
This Healthy Chocolate Puffed Rice Cereal Recipe balances indulgence with wellness, making it a go-to for when you want a treat that feels good inside and out.
- Reliable Texture: The puffed rice stays crisp and light, never soggy or chewy.
- Balanced, Cozy Flavor: A mild bitterness from raw cacao blends beautifully with natural maple sweetness.
- Pantry-Friendly: Uses common ingredients you likely already have on hand.
- Weeknight Simple: Minimal hands-on time with easy cleanup means you'll want to make it often.
Ingredient Highlights

When it comes to the ingredients for this Healthy Chocolate Puffed Rice Cereal Recipe, I always focus on quality and how each component contributes to flavor and texture. Choosing the right puffed rice and cacao can elevate your experience greatly.
- Puffed Rice: Look for light and airy puffed rice without added sugars or flavors for the best crispness.
- Liquid Coconut Oil: I prefer refined for a neutral taste, but unrefined adds a subtle coconut note.
- Raw Cacao Powder: Use unsweetened, high-quality raw cacao for a rich, slightly earthy chocolate flavor.
- Maple Syrup: Pure maple syrup adds natural sweetness and depth, adjust amount to your taste.
- Vanilla Extract: A splash enhances the chocolate and rounds out the overall flavor.

Quick Note: Exact measurements are in the printable recipe card at the bottom.
Step-by-Step for Healthy Chocolate Puffed Rice Cereal Recipe
Step 1 - Prep & Season
Start by gently melting the coconut oil over very low heat in a small saucepan, or just pop it into the microwave for about 20 seconds. The key here is patience-medium heat can make the oil separate or burn. Once melted, whisk in the raw cacao powder slowly to dissolve any lumps. You'll notice the mixture smoothing into a silky, glossy chocolate base that smells subtly earthy and inviting.
Step 2 - Build Flavor
Next, add the maple syrup and vanilla extract to your chocolate sauce and stir until everything blends beautifully. I recommend tasting at this point-if you want a sweeter cereal, a little extra maple syrup goes a long way. This step is where the flavors really bloom, forming that perfect balance of sweet and rich that you'll enjoy in every bite.
Step 3 - Finish for Best Texture
Pour your chocolate mixture evenly over the puffed rice in a large bowl. Use a gentle folding motion with a spatula or large spoon to coat each puff without crushing them. It takes a few minutes, but this careful approach ensures every piece is glossy and perfectly covered. Then, spread the mixture on a parchment-lined baking sheet in a single uniform layer, breaking up clumps but not over-handling it. Bake at 300°F (150°C) for about 12 to 15 minutes, stirring halfway through to toast evenly. The aroma of toasty chocolate is a wonderful giveaway that it's almost done. Cool completely on the sheet-this is key for crispiness. Once cooled, break apart any clusters and enjoy that satisfying crunch!
Kitchen Notes I Rely On
Consistency is king here. I always keep an eye on the baking time since puffed rice burns quickly. Also, letting this cool completely before breaking up ensures maximum crispness rather than a chewy mess.
- Doneness Cue: Look for a light toasty sheen on the cereal and a deep chocolate aroma.
- Temperature Trick: Keeping the oven at 300°F ensures gentle baking without drying it out or burning.
- Make-Ahead Move: Prepare this a day ahead. It stays crisp and even gets better as flavors meld.
- Skip This Pitfall: Don't skip the folding step-it avoids clumps and broken rice pieces.
Serving & Sides
Finishing Touches
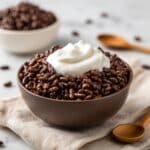
I love adding a few flakes of toasted coconut or a sprinkle of sea salt on top just before serving. It breaks up the sweetness nicely and adds a subtle crunch contrast. Sometimes I drizzle a little more warm maple syrup or almond butter on individual bowls for extra richness and creaminess that pairs beautifully with the chocolate.
Pairs Nicely With
This cereal is great alongside a cold glass of almond milk or a dollop of coconut yogurt. For a breakfast boost, banana slices or fresh berries add freshness and natural sweetness. If you're after something savory after, a simple cheese plate balances this chocolatey treat surprisingly well.
Simple Plating Upgrades
Serving this cereal in clear glass bowls really shows off the glossy cacao coating. For a special touch, garnish with a sprig of mint or a dusting of extra cacao powder. If you're making it for kids or guests, small jars or mason jars make for charming personal portions that also double as great gifts.
Make-Ahead & Storage
Storing Leftovers
Store your leftover Healthy Chocolate Puffed Rice Cereal Recipe in an airtight container at room temperature for up to a week. I find glass jars with tight lids work best to keep the cereal crisp and protected from moisture. Avoid the fridge as it tends to introduce humidity, which softens the crunch.
Freezer Tips
This cereal freezes well in a sealed freezer bag for up to 2 months. When you're ready to enjoy, let it come to room temperature before opening to prevent condensation. Freezing is perfect if you want to batch-make and keep some on hand for emergencies.
Reheating Healthy Chocolate Puffed Rice Cereal Recipe Without Drying Out
If you want to warm this cereal slightly, I recommend using a low-setting in the oven-about 250°F for 5 minutes. Spread it out on a baking sheet to refresh the crunch without drying or burning. The microwave can work in short bursts of 15 seconds but watch closely as it heats unevenly and can soften the cereal. A quick toss in an air fryer at 275°F for 3 minutes can also revive crispness beautifully.
Frequently Asked Questions
Yes! Puffed rice is naturally gluten-free, and if you use certified gluten-free ingredients for cocoa and vanilla, this recipe is safe for gluten-sensitive diets.
Absolutely. Honey or agave syrup can be substituted, but maple syrup adds a distinctive depth of flavor that I prefer for this cereal.
Yes, the recipe is naturally vegan as it uses plant-based ingredients like coconut oil and maple syrup.
The key is thoroughly coating the rice with the chocolate mixture, baking it until crisp, and allowing it to cool completely before storing to maintain crunchiness.
Final Thoughts
Making this Healthy Chocolate Puffed Rice Cereal Recipe at home feels like a small act of self-care. It's simple, wholesome, and the flavor hits just the right note between indulgent and nourishing. Each time I make it, I'm reminded how easy it is to satisfy those chocolate cravings without reaching for processed snacks. Whether it's drizzled in your morning almond milk or grabbed as a crunchy snack on the go, I'm confident you'll keep coming back to this recipe as much as I do.
PrintPrintable Recipe
Healthy Chocolate Puffed Rice Cereal Recipe
A delicious and healthy homemade chocolate puffed rice cereal that's crispy, naturally sweetened with maple syrup, and coated with rich raw cacao. It's a perfect guilt-free snack or breakfast option that's easy to prepare and made with simple, wholesome ingredients.
- Prep Time: 10 Minutes
- Cook Time: 15 Minutes
- Total Time: 25 Minutes
- Yield: About 4 servings
- Category: Breakfast
- Method: Baking
- Cuisine: American
- Diet: Vegan
Ingredients
Chocolate Coating
- 4 tablespoons liquid coconut oil
- 3 tablespoons raw cacao powder
- 2 tablespoons maple syrup, adjusted to preference
- ¼ teaspoon vanilla extract
Cereal Base
- 4 cups puffed rice
Instructions
- Melt Coconut Oil: Gently melt the coconut oil in a small saucepan over very low heat or in the microwave. Once melted, remove from heat. Whisk in the raw cacao powder until the mixture is smooth and lump-free.
- Mix Chocolate Syrup: Add the maple syrup and vanilla extract to the chocolate mixture. Stir thoroughly until fully incorporated, creating a glossy chocolate syrup. Taste and adjust maple syrup if a sweeter cereal is desired.
- Combine Puffed Rice: In a large mixing bowl, combine the puffed rice. Pour the chocolate mixture evenly over the puffed rice.
- Coat Rice Gently: Gently fold and stir the puffed rice with a large spoon or spatula, ensuring every piece is coated with the chocolate mixture. Be patient and thorough but gentle to avoid crushing the puffed rice.
- Prepare for Baking: Line a large baking sheet with parchment paper. Spread the chocolate-coated puffed rice in a single layer onto the prepared baking sheet, breaking up any large clumps and ensuring an even thickness.
- Bake to Crisp: Preheat your oven to 300°F (150°C). Bake for 12-15 minutes, stirring halfway through the baking time to ensure even crisping. The cereal should be lightly toasted and crispy.
- Cool and Serve: Allow the cereal to cool completely on the baking sheet to achieve maximum crispness. Once cooled, break apart any clumps and serve or store in an airtight container.
Notes
- Adjust maple syrup quantity based on your desired sweetness level.
- Ensure you gently fold the puffed rice to keep them intact and crispy.
- Store the finished cereal in an airtight container to maintain freshness and crunch.
- This cereal pairs perfectly with almond milk or yogurt for a nutritious breakfast.
- For a nutty flavor, try adding chopped nuts or seeds before baking.


Leave a Reply