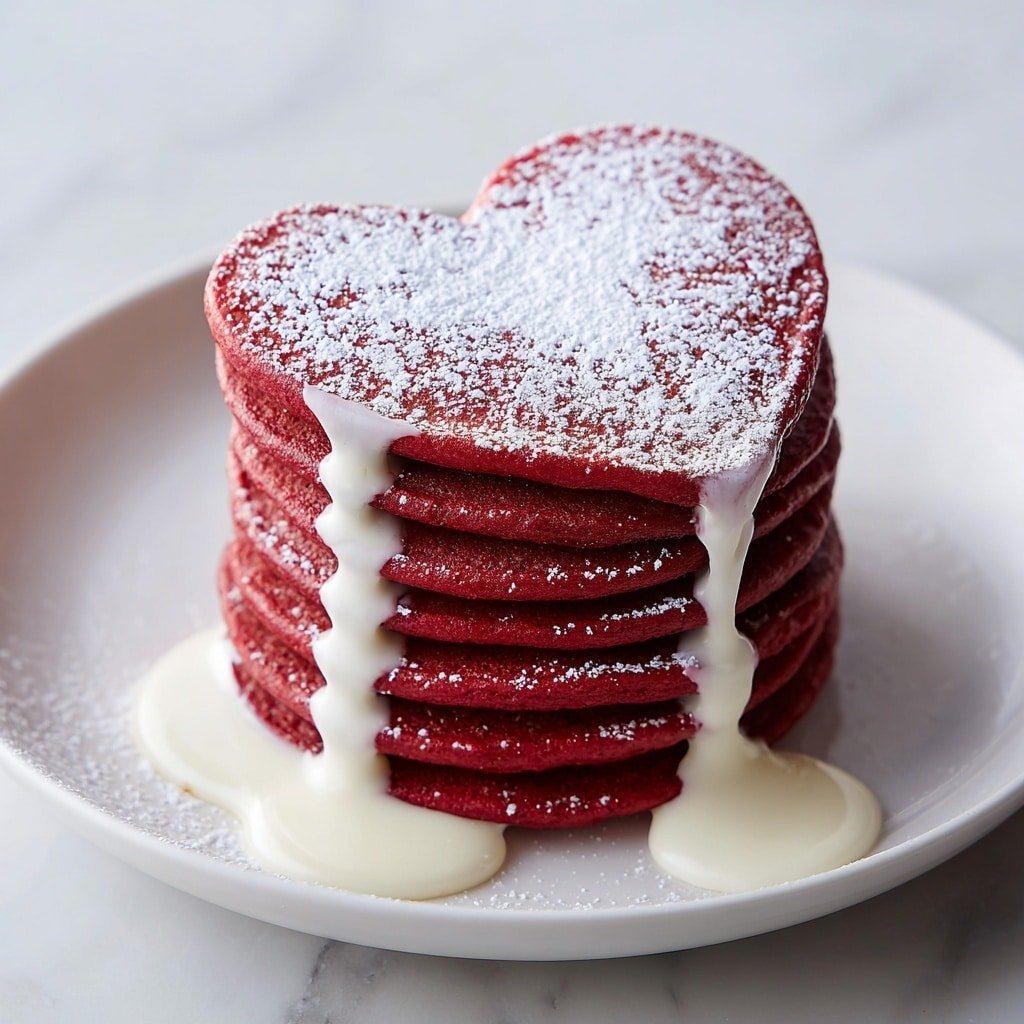
If you're looking for a breakfast that feels special yet stays simple, this Red Velvet Heart-Shaped Pancakes Recipe hits the spot beautifully. It's perfect for a cozy weekend morning, a Valentine's Day treat, or whenever you want to surprise someone with something that looks as lovely as it tastes. The rich red color paired with the tender cocoa-infused batter makes these pancakes an instant favorite around my kitchen.
Jump to:
Why You'll Make This on Repeat
I love how effortlessly these pancakes bring a festive touch to any morning. The batter blends classic flavors with a hint of cocoa and that unmistakable red velvet charm, making it a crowd-pleaser no matter the occasion.
- Reliable Texture: These pancakes stay fluffy and moist, thanks to balancing baking powder with buttermilk.
- Balanced, Cozy Flavor: The cocoa powder adds depth, while vanilla and sugar provide warmth without overwhelming sweetness.
- Pantry-Friendly: You likely already have all the staples on hand, plus a splash of red food coloring for fun.
- Weeknight Simple: Quick prep and cook times make it doable even on busier mornings.
Ingredient Highlights

Choosing quality ingredients can enhance your Red Velvet Heart-Shaped Pancakes Recipe, but don't stress fancy brands-freshness and balance matter most here. I usually opt for basic pantry staples with reliable performance to keep it unwindy and tasty.
- All-Purpose Flour: Use fresh, unbleached flour for best texture and flavor.
- Cocoa Powder: Unsweetened natural cocoa brings that subtle chocolate note without bitterness.
- Buttermilk: Adds tang and tenderness; if you don't have any, you can make a quick substitute with milk and vinegar.
- Red Food Coloring: I like to choose gel-based coloring for vibrant hues without thinning the batter.
- Vanilla Extract: Pure vanilla makes a big difference in rounding out the flavors.

Quick Note: Exact measurements are in the printable recipe card at the bottom.
Step-by-Step for Red Velvet Heart-Shaped Pancakes Recipe
Step 1 - Prep & Season
Start by whisking together your dry ingredients-flour, cocoa powder, baking powder, and salt-in a medium bowl. Mixing these well in advance ensures the leavening and cocoa are evenly distributed, so each pancake cooks up perfectly. This step takes just a couple of minutes but sets the stage for tender pancakes without any pockets of baking powder.
Step 2 - Build Flavor
In another bowl, combine the wet ingredients-fresh buttermilk, egg, sugar, red food coloring, and vanilla extract. Whisk them until smooth and glossy; you'll notice the red deepens, and the mix smells subtly sweet and inviting. Then, gently fold the wet ingredients into the dry mix, stirring just until combined. A few small lumps are fine-overmixing toughens the pancakes.
Step 3 - Finish for Best Texture
Heat a non-stick skillet or griddle over medium heat and lightly grease with butter or oil. Place your heart-shaped mold on the surface, then pour batter into it to fill the shape about two-thirds full. Watch closely as bubbles appear and the edges look set-this usually takes about 2 to 3 minutes. Gently remove the mold and flip the pancake to cook the other side for 1 to 2 minutes until golden brown and springy. This technique locks in shape and texture beautifully without sticking or breaking.
Kitchen Notes I Rely On
Through trial, I've learned that controlling the heat and timing is key for these pancakes to hold their shape and stay moist. Watching for bubbles before flipping and gentle handling makes all the difference.
- Doneness Cue: Bubbles forming and edges looking slightly dry signal it's time to flip.
- Temperature Trick: Medium heat prevents burning while giving pancakes time to cook through.
- Make-Ahead Move: You can mix the batter a few hours ahead; keep covered in the fridge and stir gently before cooking.
- Skip This Pitfall: Don't over-stir or press down with your spatula-preserving fluffiness is crucial.
Serving & Sides

Finishing Touches
I like to serve these Red Velvet Heart-Shaped Pancakes Recipe warm, topped with a dollop of whipped cream or cream cheese frosting for that classic red velvet feel. A drizzle of maple syrup adds subtle sweetness and moisture that complements the cocoa notes perfectly. Fresh berries or a dusting of powdered sugar brings brightness and contrast.
Pairs Nicely With
To balance the rich sweetness, I often serve alongside crispy bacon or a side of fresh fruit salad. The salty, savory bites and juicy freshness create a harmony that keeps breakfast feeling thoughtfully rounded and satisfying.
Simple Plating Upgrades
For a quick, charming upgrade, stack the pancakes and sprinkle edible flower petals or chocolate shavings on top. Serving on a contrasting colored plate, like white or pastel, really makes those vibrant red hearts pop-simple but so inviting for any occasion.
Make-Ahead & Storage
Storing Leftovers
Place leftover pancakes in an airtight container or wrap them tightly with plastic wrap to keep them moist. Stored in the fridge, they'll stay good for about 2 to 3 days. Just be sure to cool them completely before wrapping to avoid sogginess.
Freezer Tips
These pancakes freeze beautifully. Layer parchment paper between each one in an airtight container or freezer bag so they don't stick together. They'll keep well for up to 2 months. Thaw overnight in the fridge or warm gently in a toaster before reheating fully.
Reheating Red Velvet Heart-Shaped Pancakes Recipe Without Drying Out
To reheat without drying them out, I like using a low oven (around 300°F) wrapped loosely in foil for about 10 minutes. If using a microwave, cover the pancakes with a damp paper towel to retain moisture and heat in short bursts. An air fryer at 350°F for 3 to 4 minutes also crisps edges without drying the center.
Frequently Asked Questions
Yes! You can substitute buttermilk with a plant-based milk plus a tablespoon of vinegar, use a flax or chia egg, and swap butter for vegan alternative oils. The texture will be slightly different but still delicious.
I prefer gel or paste food coloring-it provides vivid color without diluting the batter's consistency, giving you those classic red velvet hues.
Absolutely! Freeform the hearts carefully with a spoon and spatula, or create a stencil from parchment paper to guide the shape as you pour the batter in the pan.
Mix the batter gently until just combined, avoid overmixing, and cook on medium heat so the inside cooks through without burning the outside.
Final Thoughts
Making this Red Velvet Heart-Shaped Pancakes Recipe always brings a little joy to my mornings-and I think you'll find the same. It's approachable, visually charming, and just the right balance of flavors to feel both classic and festive. Whether for a special occasion or a simple breakfast upgrade, these heart-shaped beauties invite a moment of comfort and care around the table. So go ahead, whip up a batch and enjoy that first pillowy bite together.
PrintPrintable Recipe
Red Velvet Heart-Shaped Pancakes Recipe

These Heart-Shaped Red Velvet Pancakes bring a fun and festive twist to classic pancakes with a rich cocoa flavor and vibrant red color. Perfect for special breakfasts or celebrations, they are fluffy, tender, and irresistibly delicious when served warm with syrup or whipped cream.
- Prep Time: 10 minutes
- Cook Time: 15 minutes
- Total Time: 25 minutes
- Yield: 4-6 pancakes
- Category: Breakfast
- Method: Frying
- Cuisine: American
Ingredients
Dry Ingredients
- 1 cup all-purpose flour
- 1 tablespoon cocoa powder
- 1 tablespoon baking powder
- ½ teaspoon salt
Wet Ingredients
- 1 cup buttermilk
- 1 large egg
- ¼ cup granulated sugar
- 1 tablespoon red food coloring
- 1 teaspoon vanilla extract
For Cooking
- Butter or oil for cooking
Instructions
- Prepare Dry Ingredients: In a medium bowl, whisk together the all-purpose flour, cocoa powder, baking powder, and salt until well combined, creating the base for your pancake batter.
- Mix Wet Ingredients: In a separate bowl, combine the buttermilk, egg, granulated sugar, red food coloring, and vanilla extract. Whisk these ingredients until the mixture is smooth and the red color is evenly distributed.
- Combine Wet and Dry: Gradually pour the wet ingredients into the dry mixture. Stir gently until just combined, being careful not to overmix, to keep your pancakes light and fluffy.
- Heat Skillet and Grease: Place a non-stick skillet or frying pan over medium heat and add a small amount of butter or oil to coat the surface evenly. This prevents sticking and helps achieve a golden crust.
- Cook Pancakes in Heart Shapes: Using a heart-shaped mold on the skillet, pour the batter inside the mold. Cook until you see bubbles forming on the surface and the edges look set, approximately 2-3 minutes.
- Flip and Finish Cooking: Carefully remove the mold, flip the pancake gently, and cook for another 1-2 minutes until the pancake is cooked through and golden brown on both sides.
- Serve Warm: Transfer the heart-shaped red velvet pancakes to a plate and serve immediately with your choice of syrup, whipped cream, or fresh fruit for a deliciously sweet breakfast treat.
Notes
- Use a non-stick skillet and a heart-shaped mold for the perfect shape.
- Do not overmix the batter to maintain fluffy pancakes.
- Adjust the red food coloring amount for color intensity preference.
- Serve immediately for best texture and flavor.


Leave a Reply