If you're looking for a delightful and festive dessert to make this fall, the Spooky Pumpkin Cheesecake Jars Recipe is a perfect choice. These individual treats come together quickly and offer a creamy pumpkin filling layered over a toasty graham cracker crust, all served in charming little jars. Whether you're prepping for a Halloween party or simply craving a cozy seasonal sweet, you'll find that these jars are equally fun to make and to eat.

Jump to:
Why You'll Make This on Repeat
I've found this recipe is a total crowd-pleaser because it's just the right mix of sweet, spiced, and creamy without being heavy. It's incredibly straightforward, so you can whip it up quickly even on a busy weeknight or last-minute gathering.
- Reliable Texture: The graham cracker crust stays crunchy and the cheesecake layer silky smooth every time.
- Balanced, Cozy Flavor: Warm pumpkin spices gently permeate the creamy filling for that perfect fall comfort.
- Pantry-Friendly: Ingredients like cream cheese, pumpkin purée, and spices are easy to keep on hand.
- Weeknight Simple: No baking required-it's mostly mixing and layering for fast prep.
Ingredient Highlights

Choosing quality ingredients makes a noticeable difference in your Spooky Pumpkin Cheesecake Jars Recipe. I like to use fresh spices and full-fat cream cheese to get that rich flavor and velvety mouthfeel that make these jars stand out.
- Pumpkin Purée: Opt for plain pumpkin purée, not pumpkin pie filling, to control sweetness and spice levels directly.
- Cream Cheese: Full-fat, softened cream cheese ensures the filling is creamy and smooth without lumps.
- Graham Cracker Crumbs: Freshly crushed for the best crunch and subtle sweetness in the crust layer.
- Whipped Topping & Cream: These add lightness and airiness to contrast the dense pumpkin mix perfectly.

Quick Note: Exact measurements and detailed directions are in the printable recipe card at the bottom, making it easy to follow along in the kitchen.
Step-by-Step for Spooky Pumpkin Cheesecake Jars Recipe
Step 1 - Prep & Season
Start by mixing your graham cracker crumbs, melted butter, and brown sugar until the crumbs feel evenly moistened and glossy. Press this mixture firmly into the bottom of your jars - this gives you that toasty, crunchy base that's so delightful against the smooth filling. I like using the bottom of a clean glass to press down, which helps create an even, compact layer. Be gentle but firm, aiming for about half an inch thick crust in each jar.
Step 2 - Build Flavor
Next, beat together softened cream cheese, pumpkin purée, brown sugar, vanilla, and your warm fall spices-cinnamon, nutmeg, ginger, and cloves-until everything is perfectly smooth and creamy with no lumps. This part smells heavenly; the spices really wake up the kitchen. Once smooth, gently fold in the whipped topping, which lightens the texture and makes the jars feel indulgent but not heavy. This also helps the filling set nicely in the fridge.
Step 3 - Finish for Best Texture
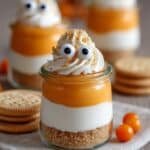
After your crust has settled, spoon or pipe the pumpkin cheesecake filling over it in each jar, leaving room for a cloud of whipped cream on top. To make the whipped cream, beat heavy cream with powdered sugar and vanilla until stiff peaks form-this ensures it holds its shape beautifully. Layer the whipped cream atop the filling and finish by decorating with mini cookies, candy eyes, or a sprinkle of extra graham crumbs for that spooky, fun look. Chill your jars for at least 2 hours before serving; this rest time lets everything meld and develop the perfect set texture.
Kitchen Notes I Rely On
When making this Spooky Pumpkin Cheesecake Jars Recipe, a few tips have saved me from any mishaps and elevated the final result. From watching for the right texture cues to prepping ahead, these pointers let you breeze through the process.
- Doneness Cue: Look for the whipped cream peaks to be firm but not dry or grainy for the best texture on top.
- Temperature Trick: Always soften your cream cheese at room temperature beforehand-to avoid lumps and ensure a velvety filling.
- Make-Ahead Move: These jars keep beautifully chilled for up to 2 days, so you can prepare them well before your event.
- Skip This Pitfall: Don't overmix the whipped topping when folding it in-use gentle motions to keep the airy lightness intact.
Serving & Sides

Finishing Touches
For that perfect spooky vibe, I love using mini cookies and candy eyes as fun decorations on the whipped cream. Not only do they add a playful texture, but they bring a dash of whimsy that's great for Halloween celebrations. A light dusting of extra graham cracker crumbs or a sprinkle of cinnamon also adds warmth and visual appeal.
Pairs Nicely With
You'll notice these jars pair beautifully with something sharp to cut through the sweetness, like a cup of spiced black tea or a bold coffee. The creamy pumpkin flavors balance out rich, slightly bitter drinks perfectly, making it a versatile dessert for any fall gathering.
Simple Plating Upgrades
For a quick upgrade, serve these jars on a rustic wooden tray with a scattering of cinnamon sticks and tiny pumpkins around. If it's a party, add small dessert spoons tied with orange and black ribbons for a festive touch. These details make an easy dessert feel special without much extra effort.
Make-Ahead & Storage
Storing Leftovers
Store your Spooky Pumpkin Cheesecake Jars in airtight containers or just keep the jars sealed with lids in the fridge. They'll maintain a creamy, fresh texture for up to 3 days. You'll notice the crust might soften slightly but remains deliciously flavorful.
Freezer Tips
Freezing isn't ideal here because the whipped cream and texture of the pumpkin filling can separate or become icy. If you do freeze them, try to eat within a month and thaw gently overnight in the fridge. Still, I recommend enjoying these fresh for the best creaminess.
Reheating Spooky Pumpkin Cheesecake Jars Recipe Without Drying Out
This dessert is best served chilled, but if you prefer things a little warmer, unwrap the jars and place them in a warm spot or give a quick gentle zap in the microwave-around 15 seconds on low. Avoid high heat since the whipped cream can melt and water-separate. You can also let the jars sit out for 10 minutes at room temp for a smoother flavor without losing the creamy texture.
Frequently Asked Questions
It's best to use plain pumpkin purée for this recipe since pumpkin pie filling contains added sugars and spices, which can make the dessert too sweet or overpower the delicate cheesecake flavor.
No baking is required for this Spooky Pumpkin Cheesecake Jars Recipe. The crust sets nicely from the butter, and the creamy filling firms up in the fridge for a no-hassle dessert.
Keep them refrigerated for up to 3 days. They're freshest within the first 48 hours but will still taste lovely after that.
Use mini cookies for tiny "mummies" or add candy eyes along with a sprinkle of graham cracker crumbs for a spooky layered look that's fun and festive.
Final Thoughts
I love how this Spooky Pumpkin Cheesecake Jars Recipe lets you celebrate the flavors of fall without spending hours in the kitchen. Its approachable steps mean you can enjoy the process as much as the result-each jar is a little celebration all on its own. When I bring these to gatherings, everyone always asks for the recipe, so I'm confident you'll find yourself making them again and again, too.
PrintPrintable Recipe
Spooky Pumpkin Cheesecake Jars Recipe
Delightfully festive and individual-sized, these Spooky Pumpkin Cheesecake Jars offer a creamy pumpkin filling layered over a buttery graham cracker crust, topped with fluffy whipped cream and playful Halloween decorations. Perfect for a seasonal treat that's easy to assemble and sure to impress at any fall gathering.
- Prep Time: 15 minutes
- Cook Time: 0 minutes
- Total Time: 2 hours 15 minutes
- Yield: 6 jars
- Category: Dessert
- Method: No-Cook
- Cuisine: American
- Diet: Vegetarian
Ingredients
Crust:
- 1 ½ cups graham cracker crumbs
- 5 tablespoon melted butter
- 2 tablespoon brown sugar
Pumpkin Cheesecake Filling:
- 8 oz cream cheese, softened
- ½ cup pumpkin purée
- ⅓ cup brown sugar
- 1 teaspoon vanilla extract
- 1 teaspoon cinnamon
- ¼ teaspoon nutmeg
- ¼ teaspoon ginger
- ⅛ teaspoon cloves
- ½ cup whipped topping
Whipped Cream:
- 1 cup heavy whipping cream
- 2 tablespoon powdered sugar
- ½ teaspoon vanilla extract
Decorations:
- Mini cookies
- Candy eyes
- Graham cracker crumbs
Instructions
- Prepare the crust: In a medium bowl, combine graham cracker crumbs, melted butter, and brown sugar. Mix thoroughly until the crumbs are evenly moistened, then press the mixture firmly into the bottom of individual jars to form the crust layer.
- Make the pumpkin cheesecake filling: Using a mixer, beat softened cream cheese, pumpkin purée, brown sugar, vanilla extract, cinnamon, nutmeg, ginger, and cloves until smooth and creamy, ensuring all spices are well incorporated.
- Fold in whipped topping: Gently fold the whipped topping into the cream cheese mixture to lighten the filling, creating a fluffy texture without deflating the mixture.
- Whip the cream for topping: In a separate bowl, beat the heavy whipping cream with powdered sugar and vanilla extract until stiff peaks form, making sure to avoid overbeating.
- Assemble the jars: Layer the jars by spooning the pumpkin cheesecake filling over the graham cracker crust. Then top each jar generously with the freshly whipped cream.
- Decorate: Add mini cookies, candy eyes, and sprinkle graham cracker crumbs on top for a spooky and festive finish to each jar.
- Chill before serving: Refrigerate the assembled jars for at least 2 hours to allow the cheesecake filling to set and flavors to meld. Serve chilled for best taste.
Notes
- Use full-fat cream cheese for the creamiest texture.
- For a lighter option, substitute whipped topping with whipped cream or a dairy-free alternative.
- Make sure the cream cheese is fully softened to avoid lumps in the filling.
- Chilling time can be extended to overnight for a firmer consistency.
- Decorations can be customized to suit any theme or preference.


Leave a Reply