If you're craving a dessert that marries rich chocolate with the beloved crunch of Oreos, this Oreo Chocolate Cupcakes Recipe will quickly become a favorite. Perfect for birthdays, casual get-togethers, or whenever you want a cozy treat, these cupcakes combine moist chocolate layers, creamy Oreo-studded frosting, and a shiny chocolate coating for a truly indulgent bite every time.

Jump to:
Why You'll Make This on Repeat
I love how these cupcakes balance fudgy texture with just the right crunch from the Oreo pieces, making each bite feel special yet familiar. Once you've nailed the technique, these come together effortlessly, making them a go-to for impressing friends or treating the family.
- Reliable Texture: The combination of cocoa powder and boiling water creates a glossy, tender crumb that stays moist for days.
- Balanced, Cozy Flavor: Subtle vanilla with chocolate deepened by Oreos makes each cupcake perfectly nostalgic.
- Pantry-Friendly: You likely have these ingredients on hand, so spontaneous baking sessions are a breeze.
- Weeknight Simple: The step-by-step method is straightforward, even if you're short on time or new to baking.
Ingredient Highlights

Choosing the right ingredients can make a world of difference in your Oreo Chocolate Cupcakes Recipe. I recommend using good-quality cocoa and fresh buttermilk to boost flavor and moisture.
- Unsweetened Cocoa Powder: Go for Dutch-processed if possible for a milder, less acidic taste that deepens the chocolate notes.
- Buttermilk: Adds gentle tang and tender crumb; if you don't have it, milk with vinegar is a perfect substitute and makes the cupcakes soft.
- Oreos: Use standard Oreos for crunch and flavor; double-stuffed can be sweeter but just as tasty.
- Chocolate Chips: Semi-sweet for a balanced chocolate coating that isn't overpowering but melts smoothly.

Quick Note: Exact measurements are in the printable recipe card at the bottom.
Step-by-Step for Oreo Chocolate Cupcakes Recipe
Step 1 - Prep & Season
Start by preheating your oven to 350°F (175°C) and lining a muffin tin with cupcake liners - I like the standard paper type for easy cleanup. Mix your dry ingredients-flour, sugar, cocoa, baking powder, baking soda, and salt-in a large bowl until they're well combined. This base ensures even flavor dispersion. Then whisk your wet ingredients in a separate bowl: buttermilk, vegetable oil, egg, and vanilla. When you combine the two, mix gently - you'll want to avoid overmixing which can toughen the cupcakes. Finally, slowly stir in boiling water; it may seem odd, but it creates a glossy batter that bakes into delightfully moist cupcakes.
Step 2 - Build Flavor
Pour your shiny, runny batter into the liners about two-thirds full for perfect rise without spillover. While these bake for 18-20 minutes, you can prepare your Oreo frosting. Beat softened butter until creamy, then gradually add powdered sugar and cream. Don't rush this-taking your time here gives you that airy, luscious texture we all love on cupcakes. Blend in vanilla, then gently fold in crushed Oreos to spread that cookie-crumble magic throughout, giving your frosting unexpected texture and bursts of flavor.
Step 3 - Finish for Best Texture
Once your cupcakes are baked and cooled completely (patience pays off!), pipe a generous swirl of your Oreo frosting on top. For the chocolate coating, melt semi-sweet chocolate chips with a little vegetable oil in 30-second bursts, stirring between each. This adds shine and smoothness so it dips beautifully. Carefully invert each frosted cupcake and dip it into the chocolate, letting excess drip off before setting it on parchment. Pop them into the fridge for 15-20 minutes to let the chocolate harden into a glossy shell. This finishing touch packs a delightful snap and extra flavor dimension.
Kitchen Notes I Rely On
From my experience, these tips help keep your Oreo Chocolate Cupcakes Recipe foolproof and special every time. Small tweaks add up to big wins in flavor and texture.
- Doneness Cue: Insert a toothpick into the center; it should come out with moist crumbs but no wet batter.
- Temperature Trick: Use room temperature eggs and buttermilk for smooth mixing and better rise.
- Make-Ahead Move: Cupcakes freeze well unfrosted - thaw before frosting for fresher results.
- Skip This Pitfall: Don't skip the cooling phase before frosting; warm cupcakes will melt your frosting and chocolate coating.
Serving & Sides

Finishing Touches
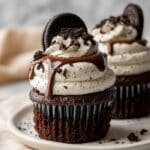
The piping technique not only looks elegant but lets the Oreo chunks shine through the frosting swirls. For the coating, the slight sheen and snap from the chocolate elevate the cupcakes from everyday to something you'll really savor. I like sprinkling a few extra crushed Oreos on top for presentation and a crunchy contrast.
Pairs Nicely With
These cupcakes pair wonderfully with a glass of cold milk or a lightly brewed coffee to balance the rich chocolate. Fresh berries on the side can also add a pop of brightness and color, which is a nice complement to the soft, decadent cupcake.
Simple Plating Upgrades
If you're serving these for guests, try placing them on a tiered cake stand and dusting a little cocoa or powdered sugar around the plate for subtle flair. A few edible flowers or a drizzle of white chocolate over the topping adds festive appeal for parties or special occasions.
Make-Ahead & Storage
Storing Leftovers
Store leftover Oreo Chocolate Cupcakes in an airtight container at room temperature for up to two days to maintain moisture without frosting damage. If your kitchen is warm, the fridge works well but bring them back to room temperature before serving for best texture.
Freezer Tips
These cupcakes freeze beautifully either frosted or unfrosted, although I prefer freezing unfrosted for fresher frosting taste. Wrap each cupcake in plastic wrap and then place in a freezer-safe bag. Thaw overnight in the fridge or a few hours at room temperature.
Reheating Oreo Chocolate Cupcakes Recipe Without Drying Out
To warm up without drying, I recommend a quick 10-15 second microwave session and then letting the cupcake rest. Alternatively, pop them in a 300°F oven wrapped lightly in foil for about 5 minutes. The air fryer on low heat can work too; just watch closely to avoid melting the frosting or chocolate coating too much.
Frequently Asked Questions
Yes, you can substitute buttermilk with regular milk mixed with half a tablespoon of vinegar or lemon juice. Let it sit for 5-10 minutes to curdle slightly before using; this gives the acidity needed to tenderize the cupcakes.
Make sure your melted chocolate is smooth and mixed with a bit of vegetable oil for flexibility. Dip the cupcakes quickly and allow excess to drip off to prevent thick, brittle layers. Refrigerate to set but avoid freezing which can cause cracking.
I recommend folding in medium-sized chunks so you get that crunch but still have smooth frosting. Finely crushed Oreos can make the frosting a bit gritty, so balance is key.
Absolutely! You can make the frosting a day ahead, keep it refrigerated, and bring to room temperature before piping. Give it a quick whip to restore fluffiness if needed.
Final Thoughts
This Oreo Chocolate Cupcakes Recipe brings together simple ingredients in a way that feels special without being complicated. I find it's perfect for moments when I want homemade treats that impress without stress. Following these steps and tips, you'll always end up with cupcakes that are moist, flavorful, and adorned with luscious Oreo frosting and a delightful chocolate coating. Whether you're treating yourself or sharing with friends, this recipe has a way of turning an ordinary day into something sweet and memorable.
PrintPrintable Recipe
Oreo Chocolate Cupcakes Recipe
Delight in these rich and moist Oreo chocolate cupcakes, featuring a smooth chocolate batter, creamy Oreo-studded frosting, and a decadent chocolate coating. Perfectly baked and frosted, they offer a delicious twist on classic chocolate cupcakes with the beloved crunch of Oreo cookies.
- Prep Time: 1 hour
- Cook Time: 20 minutes
- Total Time: 1 hour 20 minutes
- Yield: 12 cupcakes
- Category: Dessert
- Method: Baking
- Cuisine: American
Ingredients
Cupcake Batter
- 1 cup all-purpose flour
- 1 cup granulated sugar
- ½ cup unsweetened cocoa powder
- 1 teaspoon baking powder
- ½ teaspoon baking soda
- ¼ teaspoon salt
- ½ cup buttermilk or milk with ½ tablespoon vinegar
- ¼ cup vegetable oil
- 1 large egg
- 1 teaspoon vanilla extract
- ½ cup boiling water
Oreo Frosting
- ½ cup unsalted butter, softened
- 2 cups powdered sugar
- ¼ cup heavy cream or milk
- 1 teaspoon vanilla extract
- 6 Oreo cookies, crushed
Chocolate Coating
- 1 cup semi-sweet chocolate chips
- 1 tablespoon vegetable oil
Instructions
- Preheat Oven: Preheat your oven to 350°F (175°C) and line a muffin tin with cupcake liners to prepare for baking.
- Mix Dry Ingredients: In a large bowl, whisk together the all-purpose flour, granulated sugar, cocoa powder, baking powder, baking soda, and salt until well combined.
- Combine Wet Ingredients: In another bowl, mix the buttermilk (or milk with vinegar), vegetable oil, large egg, and vanilla extract thoroughly.
- Make Batter: Gradually add the wet ingredients to the dry ingredients, mixing gently just until incorporated without overmixing. Then, slowly stir in the boiling water until the batter is smooth and runny.
- Fill and Bake: Pour the batter into the cupcake liners, filling each about two-thirds full. Bake in the preheated oven for 18-20 minutes. Check doneness by inserting a toothpick in the center; it should come out clean. Let the cupcakes cool completely.
- Prepare Oreo Frosting: Beat the softened unsalted butter until creamy. Gradually add powdered sugar and heavy cream (or milk), mixing until smooth and fluffy. Stir in vanilla extract. Fold in the crushed Oreo cookies gently to distribute them evenly throughout the frosting.
- Pipe Frosting: Using a piping bag fitted with a large round tip, pipe a tall swirl of the Oreo frosting onto each cooled cupcake to create a beautiful, textured finish.
- Make Chocolate Coating: Melt the semi-sweet chocolate chips together with vegetable oil in a microwave-safe bowl. Heat in 30-second increments, stirring between each, until the mixture is smooth and glossy.
- Dip Cupcakes: Carefully dip each frosted cupcake upside down into the melted chocolate, allowing excess to drip off. Place the dipped cupcakes on parchment paper or a wire rack to set the coating.
- Set Coating: Refrigerate the chocolate-coated cupcakes for 15-20 minutes to let the chocolate harden and the coating fix firmly.
Notes
- Use buttermilk or milk with vinegar to add acidity, which helps tenderize the cupcake and activate the baking soda for better rise.
- Do not overmix the batter to keep cupcakes tender and moist.
- Boiling water in the batter intensifies the cocoa flavor and ensures a smooth texture.
- Crushed Oreos in the frosting add delightful crunch and flavor contrast.
- The chocolate coating adds a rich finish and helps keep the frosting in place.
- Store cupcakes in the refrigerator after coating to maintain freshness and chocolate firmness.


Leave a Reply