Chocolate Peanut Butter Cheesecake (No-Bake) Recipe is a luscious dessert that combines rich chocolate with creamy peanut butter in a silky, no-oven-needed cheesecake. Perfect for when you want to impress guests or treat yourself without heating up your kitchen, this dessert comes together with a buttery graham cracker crust and a decadent ganache topping. I love making this cheesecake for special occasions or weekend indulgences because it's reliably smooth, beautifully balanced, and so satisfying.

Jump to:
Why You'll Make This on Repeat
This Chocolate Peanut Butter Cheesecake (No-Bake) Recipe becomes a staple because it hits all the right notes: indulgent flavors, simple preparation, and a no-fuss chilling process that rewards you with a perfect slice every time.
- Reliable Texture: Silky cream cheese filling folded with softly whipped cream ensures a light yet rich bite without cracks or graininess.
- Balanced, Cozy Flavor: The natural peanut butter tang meets luscious dark chocolate in a harmony that isn't overly sweet but wonderfully comforting.
- Pantry-Friendly: Most ingredients like graham crackers, peanut butter, and cream cheese are easy to keep on hand for spontaneous desserts.
- Weeknight Simple: No baking involved. Just mix, chill, and drizzle - perfect for winding down after a busy day.
Ingredient Highlights

Getting to know the quality and role of each ingredient will really elevate your Chocolate Peanut Butter Cheesecake (No-Bake) Recipe. I always tell friends that simple ingredients done well make all the difference here, especially when skipping the oven.
- Graham crackers: Look for finely textured, not too gritty, since your crust sets the base and should feel buttery but crisp without lumps.
- Unsalted butter: Control the salt level yourself and use good quality for a rich, glossy crust that holds together perfectly.
- Cream cheese: Bring it fully to room temperature for the smoothest, lump-free filling; cold cream cheese can cause clumps.
- Natural peanut butter: Choose one with minimal added sugar for balanced flavor and silky texture in the cheesecake and ganache.
- Dark chocolate: Use finely chopped bars instead of chips for a shinier ganache and more intense chocolate flavor.
- Cold whipping cream: Cold cream whips better and gives you those luxury firm peaks that lighten the cheesecake filling beautifully.
Quick Note: Exact measurements are in the printable recipe card at the bottom.
Step-by-Step for Chocolate Peanut Butter Cheesecake (No-Bake) Recipe
Step 1 - Prep & Season
Start by lining a 9-inch springform pan with parchment paper on the bottom. This simple step will make releasing your cheesecake so much easier later. Then crush your graham crackers finely - I like using a rolling pin with the crackers in a sealed bag, but a food processor works too for a very even crumb. Mix the crumbs with melted unsalted butter until the texture resembles wet sand, which helps the crust press firmly so it won't crumble after chilling. Press your crust mixture evenly into the pan bottom and slightly up the sides using the flat bottom of a cup, then pop it in the fridge while you tackle the filling. This step sets the stage for a flawless crust every time.
Step 2 - Build Flavor
Next up is the peanut butter cheesecake filling. Whip your cold whipping cream to firm peaks, and set aside - if your peaks droop easily, keep whipping a bit longer to ensure it holds shape. Meanwhile, beat the softened cream cheese, Greek yogurt, powdered sugar, peanut butter, and vanilla extract with a hand mixer starting on low and gradually increasing to medium speed until thick and creamy. The key here is to avoid overmixing, which can make the filling too loose. Gently fold the whipped cream into the cream cheese mixture using a spatula until fully combined without streaks; this folding keeps the mixture light and airy. Transfer the filling to your chilled crust and smooth out the top with an offset spatula. Cover and refrigerate overnight - I always find this resting time essential to get the perfect sliceable texture.
Step 3 - Finish for Best Texture
Finally, prepare the chocolate ganache topping. Heat the whipping cream gently until just about to simmer - watch carefully to avoid boiling over - then pour over finely chopped dark chocolate. Let it sit for about three minutes before stirring to melt the chocolate smoothly. The ganache should be shiny and fluid enough to pour but thick enough to coat the cheesecake without running off. Pour it over the chilled cheesecake and smooth to the edges. Quickly pipe lines of peanut butter on top and create a marbled design by running a toothpick through the ganache perpendicular to the lines - trust me, the effect always draws a crowd! Put the cheesecake back in the fridge for about 15 minutes to firm the ganache before slicing. When cutting, dip your knife into hot water and wipe it clean between slices to get impeccable, neat pieces. You'll notice this attention to detail elevates your presentation instantly.
Kitchen Notes I Rely On
Over the years, I've learned that patience with chilling times and gentle folding makes or breaks this Chocolate Peanut Butter Cheesecake (No-Bake) Recipe. Every subtle detail adds up to a dessert that feels truly special.
- Doneness Cue: The cheesecake's surface should be firm to the touch but not hard; it holds shape beautifully when sliced after proper chilling.
- Temperature Trick: Always bring cream cheese to room temperature and cream it first to avoid lumps in your filling.
- Make-Ahead Move: Refrigerate overnight to let the flavors meld and texture set. It tastes even better the next day!
- Skip This Pitfall: Don't try to rush ganache setting in the freezer - it can crack. Keep it in the fridge for a slow, smooth finish.
Serving & Sides

Finishing Touches
I like finishing this Chocolate Peanut Butter Cheesecake (No-Bake) Recipe with a light dusting of cocoa powder or a few roasted peanuts for crunch. The marbled ganache and peanut butter design carry the dessert visually, but a simple sprinkle of flaky sea salt can also elevate the sweetness and deepen the peanut flavor wonderfully.
Pairs Nicely With
This cheesecake pairs beautifully with a fresh berry compote-you'll enjoy the tart brightness balancing the richness. A cold glass of milk or a creamy cappuccino also complements the flavor perfectly. For adult guests, a bold cup of espresso or nutty whiskey can be an unexpected but delightful match.
Simple Plating Upgrades
For a quick weeknight upgrade, serve individual slices with a dollop of whipped cream and a few chocolate shavings on top. For a special occasion, consider adding a drizzle of warm caramel or garnishing with edible gold leaf for a wow-factor that's easier than it looks.
Make-Ahead & Storage
Storing Leftovers
Store leftover cheesecake in an airtight container or cover the springform pan tightly with plastic wrap. It keeps well in the fridge for up to 4 days. You'll find that the texture remains creamy and fresh-just make sure it stays well chilled to avoid softening too much.
Freezer Tips
This cheesecake can be frozen for up to 2 months. Wrap it tightly in plastic wrap followed by aluminum foil to prevent freezer burn. When ready to enjoy, thaw overnight in the fridge. Ganache might lose a bit of its shine but will still taste delicious. I usually recommend freezing whole cakes rather than individual slices to maintain the texture.
Reheating Chocolate Peanut Butter Cheesecake (No-Bake) Recipe Without Drying Out
Since this cheesecake is best served chilled, reheating isn't typical. However, if you want to soften it slightly, warm slices gently in the microwave on low power for 5-8 seconds. Avoid overheating, which can cause the peanut butter and ganache to separate. Alternatively, let it sit at room temperature for 15-20 minutes to bring out flavor without drying the texture.
Frequently Asked Questions
Yes, you can use crunchy peanut butter, but it will add a bit of texture to the cheesecake. If you prefer a velvety smooth filling, natural smooth peanut butter is best.
While chilling overnight gives the best texture and flavor development, a minimum of 6 hours in the fridge will also work if you're short on time.
Certainly! You can try crushed digestive biscuits or chocolate cookies for a different flavor profile. Just make sure to adjust the butter quantity accordingly to get the right crunch and firmness.
Greek yogurt adds a slight tang and lightness to the filling, but you can substitute it with sour cream or skip it if you prefer a denser cheesecake.
Final Thoughts
I hope you enjoy making and indulging in this Chocolate Peanut Butter Cheesecake (No-Bake) Recipe as much as I do. It's a dessert that's approachable but impressive, comforting yet elegant-a perfect balance for any celebration or casual treat. Remember, the key to success here is patience with chilling times and gentle folding, so take your time and savor every step. Happy baking (or rather, no-baking)!
PrintPrintable Recipe
Chocolate Peanut Butter Cheesecake (No-Bake) Recipe
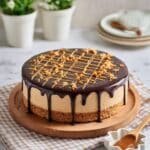
A rich and creamy no-bake Chocolate Peanut Butter Cheesecake featuring a crunchy graham cracker crust, smooth peanut butter cheesecake filling, and a luscious chocolate ganache topping with a decorative peanut butter marble design. Perfect for special occasions or indulgent desserts.
- Prep Time: 1 hour 15 minutes
- Cook Time: 0 minutes
- Total Time: 13 hours 15 minutes
- Yield: 12 servings
- Category: Dessert
- Method: No-Cook
- Cuisine: American
Ingredients
Graham Cracker Crust
- 350 g graham crackers
- 230 g unsalted butter, melted
Peanut Butter Cheesecake
- 300 g whipping cream, cold
- 750 g cream cheese, softened to room temperature
- 150 g greek yogurt
- 100 g powdered sugar
- 150 g natural peanut butter
- 1 tablespoon vanilla extract
Chocolate Ganache
- 100 g dark chocolate, finely chopped
- 100 g whipping cream
- 20 g natural peanut butter, for the design on top
Instructions
- Prepare Graham Cracker Crust: Line a 9-inch springform pan with parchment paper on the bottom. Crush the graham crackers finely using a rolling pin or food processor, then transfer to a small bowl. Mix in melted butter until mixture has a wet sand texture. Press the crumb mixture firmly into the bottom and up the sides of the pan. Chill in the fridge while preparing the filling.
- Whip Cream: In a medium bowl, beat the cold whipping cream with a whisk or electric mixer until firm peaks form. Set aside.
- Make Cream Cheese Mixture: In a large bowl, beat cream cheese, greek yogurt, powdered sugar, peanut butter, and vanilla extract on low, increasing to medium speed until thick and creamy.
- Combine Mixtures: Fold the whipped cream gently into the cream cheese mixture with a spatula until fully combined and smooth with no streaks.
- Fill Crust: Spread the cheesecake filling evenly into the chilled crust using an offset spatula to smooth the top. Cover and refrigerate overnight to set.
- Prepare Chocolate Ganache: Heat whipping cream gently in a saucepan or microwave until just simmering. Pour over chopped dark chocolate in a heat-safe bowl and let sit for 3 minutes. Stir until smooth and shiny.
- Cool Ganache: Allow ganache to thicken to a pourable but thick consistency while monitoring. Keep ready to pour over the set cheesecake.
- Release and Decorate Cheesecake: Remove cheesecake from springform pan and place on serving dish. Fill a small piping bag with the peanut butter. Pour ganache evenly over the cheesecake and spread to edges with an offset spatula.
- Create Marbled Design: Pipe thin straight lines of peanut butter over the ganache. Drag a toothpick perpendicularly through the lines to create a marble effect. Refrigerate for 15 minutes for ganache to set.
- Serve: For clean slices, run a knife under hot water, wipe dry, and slice the cheesecake. Repeat between cuts for best presentation.
Notes
- Chilling the crust before adding filling helps maintain structure when slicing.
- Use cold whipping cream for achieving firmer peaks when whipping.
- Softened cream cheese at room temperature blends more smoothly with other ingredients.
- The ganache should be thickened but still pourable for easy spreading.
- If you don't have a piping bag, use a ziplock bag with a small corner cut off for peanut butter piping.
- Keep cheesecake refrigerated until serving to maintain firmness.
- Heating the knife blade before slicing helps create neat, clean cuts.


Leave a Reply