If you're looking to impress at your next gathering or craving a cozy yet magical dessert, the Homemade Hufflepuff's Layer Cake Recipe is just the thing. Inspired by the warm and inviting spirit of the Hufflepuff house, this cake combines soft layers, a rich chocolate ganache, and a dreamy yellow buttercream frosting that brings it all together. I find it's perfect for birthdays, special occasions, or simply whenever you want to add a little enchantment to your day.

Jump to:
Why You'll Make This on Repeat
This cake has become one of my go-to recipes because it balances approachability with a certain wow factor. It's not just visually stunning but also reliably delicious, whether you're baking for family or friends.
- Reliable Texture: Moist and tender crumb that holds up beautifully when layered and frosted.
- Balanced, Cozy Flavor: The subtle vanilla and buttery notes complement the luscious chocolate ganache perfectly.
- Pantry-Friendly: Uses simple ingredients you probably already have, making it easy to whip up on a whim.
- Weeknight Simple: The steps are straightforward and forgiving, great even if you're new to layered cakes.
Ingredient Highlights

Choosing quality ingredients for your Homemade Hufflepuff's Layer Cake Recipe sets the foundation for success. Even simple components like flour and butter deserve attention, as they influence your cake's texture and depth of flavor.
- All-purpose flour: Look for unbleached flour for a more natural flavor and better rising.
- Unsalted butter: Makes it easier to control salt levels; softened for easy creaming.
- Granulated sugar: Use regular or brown sugar depending on how deep and moist you want your cake.
- Vanilla extract: Pure vanilla adds a fragrant, genuine sweetness.
- Heavy cream: Essential for smooth ganache; full-fat ensures glossy results.
- Semi-sweet chocolate chips: Go for quality chocolate to avoid grainy ganache.
Quick Note: Exact measurements are in the printable recipe card at the bottom.
Step-by-Step for Homemade Hufflepuff's Layer Cake Recipe
Step 1 - Prep & Season
Start by preheating your oven to 350°F (175°C). Grease and flour three 8-inch round cake pans thoroughly-this helps your layers come out clean without sticking. Then, in a medium bowl, whisk together the flour, baking powder, and salt. You'll want to see the dry ingredients evenly combined, which ensures your cake rises uniformly. I always take a moment here to sift if my flour has clumps; it makes the batter silkier.
Step 2 - Build Flavor
In a stand mixer or with a hand mixer, beat the softened butter and granulated sugar on medium speed until you get a pale, fluffy mixture-this usually takes about 3 to 5 minutes. You'll notice it lightening in color and becoming glossy, which is a great indicator you're on track. Next, add the eggs one at a time, beating well after each addition so the batter stays smooth and emulsified. Stir in the vanilla extract, then alternate adding dry ingredients with milk, mixing gently until just combined. Overmixing here can lead to a dense cake, so keep things tender.
Step 3 - Finish for Best Texture
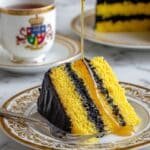
Divide the batter evenly into your prepared pans, tapping them lightly on the counter to release air bubbles. Bake for 20-25 minutes, or until a toothpick inserted near the center comes out with moist crumbs but no wet batter. Once baked, let the layers cool completely-this can't be rushed if you want smooth frosting. When cool, use a serrated knife to level each cake, trimming domed tops for even stacking. Spread the luscious ganache between layers, then chill before applying the crumb coat and finishing with your yellow buttercream. The result? Soft, vibrant layers with a glossy ganache drizzle that feels like a hug on a plate.
Kitchen Notes I Rely On
I've found that simple attention to detail can take this cake from great to unforgettable. Baking is as much about feel as it is about following instructions.
- Doneness Cue: The toothpick test works best when the toothpick comes out with very few moist crumbs, not completely dry.
- Temperature Trick: Room temperature eggs and butter blend together more seamlessly, avoiding curdling.
- Make-Ahead Move: Bake the layers a day ahead and wrap them well; this resting improves crumb stability.
- Skip This Pitfall: Don't frost while the cake is warm-it'll ruin texture and cause frosting to slide off.
Serving & Sides

Finishing Touches
I like to finish this layer cake with edible gold dust or subtle themed cake toppers that add a magical touch without overwhelming the flavors. The yellow buttercream shines on its own, giving a sunny vibe that's perfect for Hufflepuff fans and dessert lovers alike. Plus, the drizzled ganache creates a beautiful, glossy contrast that makes every slice feel special.
Pairs Nicely With
This cake pairs wonderfully with a simple cup of black tea or a latte, which balances the sweetness and adds warm, comforting notes. For a more festive touch, serve with lightly whipped cream or fresh berries that brighten each bite and add a bit of freshness.
Simple Plating Upgrades
A quick dusting of powdered sugar or some scattered edible flowers around the plate can elevate your presentation effortlessly. If you're in a hurry, a few chocolate shavings or even a dollop of your yellow buttercream next to each slice gives a polished look that guests will appreciate.
Make-Ahead & Storage
Storing Leftovers
Store your Homemade Hufflepuff's Layer Cake in an airtight container or cake dome in the fridge for up to 4 days. The layers stay moist, and the frosting keeps its texture without drying out. Just beware that with refrigeration, the cake firms up, so letting it sit at room temperature for about 30 minutes before serving helps bring back that soft crumb.
Freezer Tips
This cake freezes well if you wrap individual layers tightly in plastic wrap and then foil. When you're ready to enjoy it, thaw the layers overnight in the fridge before assembling, or thaw fully assembled cakes wrapped in plastic wrap for about 24 hours. Freezing preserves texture excellently but avoid freezing after adding ganache drizzle to keep the glossy finish intact.
Reheating Homemade Hufflepuff's Layer Cake Recipe Without Drying Out
If you want to warm a slice, the microwave on low power for 10-15 seconds works well, but watch closely to avoid overheating. Alternatively, a brief 5-minute warm-up in a 300°F oven wrapped loosely in foil helps retain moisture. I usually avoid the air fryer for this, as it can dry the frosting quickly.
Frequently Asked Questions
Yes! Use vegan butter or coconut oil, flax eggs as a substitute for regular eggs, plant-based milk, and coconut cream for the ganache. The texture might be slightly different but still delicious.
You can use a tiny pinch of turmeric powder or naturally color the batter with saffron-infused milk for a gentle yellow hue. Keep it subtle to avoid flavor changes.
A serrated knife or cake leveler works best. Let the cakes cool completely, then gently saw off the domed tops to create a flat, even surface for stacking.
Absolutely. Ganache can be made a day or two in advance and stored in the fridge. Warm it gently before using to bring it back to a spreadable consistency.
Final Thoughts
Making the Homemade Hufflepuff's Layer Cake Recipe is a delightful experience that combines simple steps with magical results. I love how the flavors come together, and I'm confident you'll enjoy both the process and the smiles it brings. Whether it's your first layered cake or you're adding another favorite to your repertoire, this one's a keeper that I keep coming back to. Give yourself time, embrace the warmth of baking, and soon enough, you'll have a cake worthy of any wizarding feast.
PrintPrintable Recipe
Homemade Hufflepuff's Layer Cake Recipe
This Homemade Hufflepuff's Layer Cake is a delightful, vibrant treat inspired by the magical world of Harry Potter. Featuring soft yellow layers infused with a smooth vanilla flavor, and a luscious chocolate ganache, this cake is perfect for celebrations or themed parties. The moist texture and rich frosting layers come together beautifully, making it a showstopper on any dessert table.
- Prep Time: 30 minutes
- Cook Time: 25 minutes
- Total Time: 1 hour 25 minutes
- Yield: 12 servings
- Category: Dessert
- Method: Baking
- Cuisine: American
Ingredients
For the Cake
- 2 cups all-purpose flour
- 1 tablespoon baking powder
- ½ teaspoon salt
- 1 cup unsalted butter (softened)
- 1 ¾ cups granulated sugar
- 4 large eggs
- 2 teaspoon vanilla extract
- 1 cup whole milk
- several drops yellow gel food coloring
For the Ganache
- 1 cup heavy cream
- 2 cups semi-sweet chocolate chips
- several drops black gel food coloring
For the Frosting
- 3 cups powdered sugar
Optional Decorations
- additional decorations such as edible gold dust or themed cake toppers
Instructions
- Preheat and Prepare Pans. Preheat your oven to 350°F (175°C). Grease and flour three 8-inch round cake pans to prevent sticking.
- Mix Dry Ingredients. In a mixing bowl, whisk together the all-purpose flour, baking powder, and salt to ensure an even distribution of leavening agents.
- Cream Butter and Sugar. Beat the softened unsalted butter and granulated sugar on medium speed using a stand mixer until the mixture becomes light and fluffy.
- Add Eggs and Vanilla. Incorporate the eggs one at a time, beating well after each addition, then mix in the vanilla extract to infuse flavor.
- Combine Wet and Dry Ingredients. Gradually add the dry ingredients to the butter mixture alternated with whole milk, mixing just until combined without overmixing.
- Color the Batter. Add several drops of yellow gel food coloring to the batter and mix gently to achieve the signature Hufflepuff yellow color.
- Divide and Bake. Evenly divide the batter among the prepared cake pans and bake in the preheated oven for 25 minutes, or until a toothpick inserted in the center comes out clean.
- Prepare Ganache. Heat heavy cream in a small saucepan over medium heat until it begins to simmer. Pour the hot cream over the semi-sweet chocolate chips in a bowl. Let sit for a few minutes, then stir until smooth. Add black gel food coloring if desired and mix well.
- Cool and Level Cakes. Allow the cakes to cool completely. Use a serrated knife to level the tops for even stacking.
- Assemble Layers with Ganache. Stack the cake layers, spreading ganache evenly between each layer for a rich chocolate filling.
- Apply Crumb Coat. Frost the outside of the cake with a thin yellow buttercream crumb coat to seal in crumbs. Refrigerate for 30 minutes to set.
- Frost and Decorate. Apply a final smooth layer of yellow buttercream frosting over the cake. Drizzle the cooled ganache on top decoratively.
- Chill Before Serving. Chill the assembled cake for at least 30 minutes before slicing and serving to ensure clean cuts and set frosting.
Notes
- For a dairy-free version, substitute vegan butter for unsalted butter, and plant-based milk for whole milk.
- Flax eggs can be used as a vegan substitute for eggs by mixing 1 tablespoon flaxseed meal with 3 tablespoon water per egg.
- Using fresh baking powder is essential for a good rise and fluffy texture.
- When leveling cake layers, a serrated knife or cake leveler ensures even stacking and a professional finish.
- Edible gold dust or themed cake toppers can enhance the Hufflepuff aesthetic and make the cake more festive.
- Chilling the cake after crumb coating helps achieve a smoother final frosting layer.
- Store leftover cake covered in the refrigerator for up to 3 days for freshness.


Leave a Reply